Python Full Course 2026 | Python Tutorial For Beginners | Python Programming Tutorial | Simplilearn
Key Takeaways
This video provides a comprehensive introduction to Python programming, covering the basics of Python syntax, data types, control structures, functions, and object-oriented programming, with a focus on machine learning fundamentals
Full Transcript
Welcome to Simply Learns YouTube channel. If there is one programming language that has transformed the technology industry over the past decade, it is Python. Known for its simple syntax, readability, and versatility, Python has become the go-to language for beginners and professionals alike. Today, Python powers some of the most exciting fields in technology, including artificial intelligence, machine learning, data science, data analytics, automation, web development, cyber security, cloud computing, and even robotics. Companies ranging from startups to global technology giants rely on Python to build scalable applications and solve complex business problems. One of the biggest advantages of Python is that it allows developer to focus on solving problems rather than worrying about complicated programming syntax. This makes it one of the easiest languages to learn while also being powerful enough to enterprisegrade application. In this complete Python course, you will learn everything from the fundamentals of programming to advanced Python concepts used in real world projects. You will start with Python basics and gradually move into data structures, object-oriented programming, file handling, automation, web development, and data analysis. By the end of this course, you'll have a strong foundation in Python programming and confidence to apply to Python across multiple domains including software development, AI analysis, and automation. Having said that, let's take a look at the agenda for today. We will start off with module one, which is introduction to Python and programming fundamentals. Module two is setting up Python environment and development tools. Module three is variables, data types, and operators. Module four is conditional statements and loops. Module five is functions and modular programming. Module six is lists, tpples, sets, and dictionaries. Module seven is strings and advanced data manipulation. Module 8 is object- oriented programming in Python. Module 9 is exception handling and file operations. Module 10 is working with libraries and packages. Module 11 is Python for data analysis. Module 12 is data visualization with Matt plot lib and seabon. Module 13 is web development with Flask and Django basics. Module 14 is automation APIs and real world Python applications. Module 15 is Python projects interview questions and answers. Hope I made myself clear with that agenda. That said, if these are the type of videos you'd like to watch, then hit that subscribe button with a bell icon to get notified whenever we host. Also, just so that you know, if you want to upskill yourself, master data science and data analytics skills and land your dream job or even grow in your career, then you must explore Simply Learn's cohort of various data science and data analytics programs. Simply learn offers a variety of master certification and post-graduate programs in collaboration with some of the world's leading universities. Through our courses, you will gain knowledge and work ready expertise in skills like Python, Tab, New, PowerBI, generative AI and overhead ads and others. And that's not all. You'll also get the opportunity to work on multiple projects led by industry experts working in top tier data and product companies. After completing these courses, thousands of learners have transition into a data science or data analytical role as a fresher or moved on to a higher paying job and profile. If you're passionate about making your career in this field, then make sure to check out the link in the pin comments and in the description box to find a data science and data analytics program that fits your experience and areas of interest. So let's get started with our Python full course with a small quiz. Why is Python considered beginner friendly? It requires complex syntax. It has a simple and readable syntax. It only works on Linux. It does not support libraries. Please let us know your answers in the comment section below. Now over to our training experts. >> I'm using Windows as operating system to install Python. Go to the official website of Python and you can see Python downloads will be there. Just click all over here and you'll be directed to this URL. Now click on download Python install manager and you can see this is going to get downloaded. After this click on all over here and let's maximize this. So guys since I have already installed Python so it's showing me reinstall Python but but for you it is going to show install Python. So you have to click all over here since I won't be doing it. So I'll be directly launching my Python. Now you can see are you're going to get some terminal like this. So you can click on yes and start it. But I won't be doing it because I have already installed Python. And the next step that you need to do is go to your given command prompt. And here you need to type python - version. And you can see all over here you're going to get the required python version. Now guys, I hope so you have got a brief idea like how we have installed Python. Now let us try to run some of the given code in Python. Now for running the given Python code, I would suggest you to install PyCharm which is amazing ID for the Python based projects. So go all over here and type PyCharm download and this is powered by Jet Brains. So all you can do all over here click on download. So accept all click on download and it is going to be downloaded for you. Very amazing ID guys. Do try this out and let us know how do you feel about this ID in the comment section. Now guys let us create one folder all over here. Click this folder and let's say it's a Python folder. So, Python demo you can type. Okay. Now, open this folder and let us try to create one file. Let's go to new and create a file and you can give this name as a hello. py. Okay. Now, open this given file in the terminal. So now guys after that you need to type python hello. py. So we have created hello world from the command prompt only. Now just click all over here and you are going to see a hello world. We can start by you know having a quick uh walk around of how to install Python. So I've already got the Python installed. But in case if you're new to this, then you can just pause the video and go to this link where you will understand how to download Python. But also I'll also give you a quick briefing. You can just navigate to python.org. And here uh you can just download Python and get it installed. And then we have another option as well. So you can also install Anaconda. And if you just download and uh just go through the basic protocols and recommended settings by Anaconda, you'll have everything installed in your PC. You can also check in every other box that uh the installer shows you. You can add the Python path file to your environment variables etc. And you'll have a quick briefing in the tutorial I've linked in the description box below. So once uh Python is installed you can just open up or fire up Anaconda or Jupyter notebook or you can also go with PyCharm any of the online compilers or any of the ID which is comfortable for you to use Python. So I'm going with Jupyter notebook here. So we've already got the entire workbook on this particular Python tutorial. So we'll be going stage by stage or module by module. So let me quickly fire up a new terminal or a new notebook and uh I'll name it as select kernel and I'll name it as uh python basics so that we can execute each and every command in our modules here you know stage by stage and for safe side I've also got this uh code saved in my notebook as well notepad as well so you can run them. So let's begin with the basics. So here I'll execute this particular one. So Python is one of the most popular programming languages for software development, AI, machine learning, all those things. And we can quickly start. You can just command these. Anyways, I must command them. There you go. The basics happen. So now we will start with module one. So here you have two sections uh code and markdown. So I'll enter markdown. So wherever I have uh some module headings or titles, I'll use uh this particular section as a markdown and then we'll switch to code. So if you are familiar with any of the basic programming languages like C or C++, then you already know you have a lot of boilerplate code like you might have to import the uh you know uh studio.io input output operations or any of the extra libraries that you need. But in this case the syntax is really simple. Let's say I want to print something like uh welcome to simply learn and done that's all you will get the code executed. So it's just a basic understanding of how simple the syntax of Python is. Now we will dive into the next module. We will understand the fundaments like data types and all those things. So we'll quickly switch to module 2 and I'll like to place the same code here and I'll name it as data types variables and I'll deem it as markdown and execute the code. Now let's start with the first uh data type which is integer. So I'll call it as role number is equals to 10 and the next would be u you know I can give float it is equals to 57 and the next can be a name which could be a string type and it would be Alice is student this could be a boolean and I'll name it as true. There you go. So we have created a profile for a candidate. And now let's say I want to check the data type and it's really simple. You can just print of and the variable names. So I've got role number here. I've got height and I've got name and also a boolean value which says student or not. Let's quickly run this cell and there you go. So you have integer, float, string and boolean. So just like any other programming language, Python also supports a wide variety of data types. So these are the basic uh data types and variables that you will be coming across in Python programming. And now let's proceed with some naming conventions. So uh naming convention basic or best practices. So uh try to avoid any blank spaces in variables. So whenever you're naming a variable try to avoid any of the blank spaces. You can take an example of student_ame in place of student name. Right? So this avoids a lot of confusion if you're dealing with the data frames or any of the real time analytics or any of the real-time programming situations. Now that we have a basic understanding of the data types, variables and the best practices, we can now dive into the third module which will be about the data structures in Python or data collections as well. And here we will be having all those uh collections which will be the set tpple and all those things. We can start with list. So what is a list? So list is an ordered set of elements or collection of elements of different data types or unique data types as well. Unique or similar data types. For example, let's say I want to create a list of fruits and it will start with a square bracket. Remember the square bracket. So apple, orange. Now I want to print fruits. Now let's understand something. So we have four different collections here. We have list, we have a set, we have dictionary and we have a tpple. So all of these will have similarities but they also differ in few situations. Now a list and a set are similar. They also are capable of storing different data types and all those things. Right? Let's say I want to include a collection of data types like name which is a character data type or a string data type and then I want to include the float data type which could be 10 point with decimal value and then I want to include role number which could be an integer. They all store all those things. Now how they differ is the type of execution in the end. Let's say I entered some fruit names here apple orange grapes etc. And if I want to append a new name, I can also append a new name. If I want to delete something, I can delete something. And when I print, it stores the order. Let's say I entered apple in the first place. So apple could be coming in the first place, orange in the first place and grape in the first place. This happens in list. But when you come across set, that particular order cannot be executed. It might miss the order. It might go with orange in the first place or grapes in the first place and then comes the next no names. And when it comes to set, let's say I have a duplicated element here. Let's say I type apple for two times. Apple apple orange grapes. The set will not print apple twice. It will only print it once. Now this is one specular difference between a set and a list. And when it comes to ppple, tpple is also same. It can also store different data types in one particular tpple. But the problem is tpple will not allow you to change anything. It is immutable. Now this is the second difference. Both set and list are mutable but tpple is not mutable. You might also face an interview question where an interviewer will ask you to change something in a tpple which can be done with a little trick. So that's uh have it executed using the inclusion of list inside a tpple. So this is possible tpple will include a list inside itself and vice versa. A list can also include a tle in itself. So we'll go through all those things. Now first we have created a small list with names apple origin grapes and we are able to print that particular list here. And we can also go through some simple operations. Let's say I want to append mango to to this particular list. So I can simply use it as fruits append function and uh the name of the fruit that I want to add will be mango. There you go. And I'll execute this. Now let's say I want to print fruits again. There you go. I have mango added to this particular list. And now let's say I want to remove uh something. So I'll simply use fruits dot remove function. And uh let's say I want to remove grapes. So I'll type down grapes. Close the function. Execute this. And now let's say I want to print again. There you go. So we have successfully removed grapes. Now this was the uh basic fundamental operation of adding or removing any element from a list. Now let's go through another example where we try to store different types of elements. Let's say I want to go ahead with Alice example. Once again here Alice is the string type and let's say her height is 5.7 ft and her role number is 10 and uh is she a student? Yes. There you go. Close the list. And now I want to print the items here. So you can just casually print items and there you go. Now let's say I want to also uh understand the data types here. So I can just use the same print command. print type and since we using list here so I can go ahead with items which is the list name and I can give the cell address there you go and we can also make some modifications to it so it's quite understandable so the cell address 0 represents the first element in the list one will be the second element second will be the third element and third will be the fourth element so uh the addresses start from zero in list And when we execute we can understand it can also store string, float, integer and boolean data types in one single list. So now let me give out a single clue to you to understand list. So it might also be an interview question for you in future. Uh they can just give you an input and say identify if it is a list or apple or a set or a dictionary. Then if you see the array or any um data type data structure starting with a square bracket then understand it's a list. Now so far with our understanding let's uh give a quick definition to list. So I have mentioned the definitions here. Let's quickly enter them here as well. So a list is a heterogeneous data structure meaning it can store multiple data types such as integers, floats, strings and booleans within the same list. Although Python allows mixed data types, in real applications, developers usually keep list constants for better uh readability and processing. Let's say in real time you're using list then most recommended best practice is use a single data type so that you may not face any confusions with that. Now with that let's move on to tpples. So I'll mark it down as module 3 here the list and now here we'll start with tpple. Now let's start with the second data structure here which is tpple. So to define a tpple is an ordered collection of elements but it is not uh changeable or can also term it as immutable and it is completely similar to list but there are some differences. If you want to add a new element to an existing tpple you may not. And if you want to delete something from an existing tpple, you may not. And if you want to make any kind of modifications to it, you cannot. That's the difference with separates tpples from list or any other data structure in the upcoming modules. Now, so uh another best way to identify if it is dppel or not is it will always start with an open bracket or parenthesis and closes with a parenthesis. Now swapping elements, inserting any elements, removing, reordering is not possible in this particular data structure and you can also use any type of uh append or delete operations. Now let's go with the same example. Let's say I want to add fruits. The only different was make happens here is you can just change the type of bracket and there you go. Now it's a tpple. Now let's say I want to print this particular tpple. There you go. it retains the order as well. Now apart from that let's say I want to add different data types inside a tuple. I can also do that and I can also type to repeat and I can also try to extract the data types as well. Now remember that interview question that we discussed changing an element inside a tpple. It is possible when you try to include a list inside the tpple. So let's go through an example of that as well. I will take an example of the same list that we have here or we can also create uh a new variable IQ which is interview question or a question is equals to let's say I try to enter some elements 1 comma 2 comma 3 and the last element will be a list. Let's say I want to enter four and five inside the list and close the bracket. Now let's print the question and now you have the tpple printed. Now let's say I want to change one of the element inside this particular tpple which is inside a list. Let's say I want to change 4 5 to 56. Now what you can do is you can simply type down the same question here and you can say question remember this little addressing that we did here this particular one the same we can try to address the elements here so we have the 1 2 3 right the third element is four five so it starts from zero I want to allocate this particular list with three 0 is equals to let's say six and now if I print this particular question then I have six right so there you go we have now successfully change the element inside a tpple now we can proceed with our next data type which would be a set now let's quickly go through the definition of a set now so far we have understood what a tpple is and what a list is now to understand set you might have to go through the similarities properties that we had with list first. Right? So the only difference what separates a list and a set is the type of parenthesis we use. So here or the bracket we use in the list we used a square bracket in tpples we used a rounded bracket in the set we will use a flower bracket. That's the only difference and apart from that if you want to include any kind of duplications inside a set that is not possible. So for that let me go through an example. Let's say I want to create a new set here and the set could be named as numbers is equals to and it starts with a flower bracket 1 comma 2 comma 2 comma 3 comma 3. See I'm deliberately trying to enter some duplicate entries here. Now let's say I want to print numbers. So these particular duplicate entries will be eliminated and only the unique values will be printed inside the set. Now I can also go through the same example that we used before which is this one fruits name. And if I want to print fruits sometimes the order may exist and sometimes the order may change. That's the difference between a list and a tuple. The orders might change here. So you can see grapes took the first position, orange to the second and apple to the third. And if you want to add or remove any elements to this particular fruits set, you can also do that by a simple add method. Let's say I want to add some berries. There you go. If I print fruits again, I will have the new element added. Let's say I want to remove an element. So I can also do that by just using the remove uh method or remove function. And let's say I want to remove apple. I can do that. And if I print fruits again, the element will be removed from the list. With that, let me also drop a quick comment here. The best way to identify a set is it always starts with a flower bracket. Now, a set will also be capable of storing multiple data types as well. So, we'll use the same example. And here we have two different items but it is showing one once because it is considering the integer value of one as a unique element and the float value of one as a duplicate element of one including the boolean value of true here. That's the one reason why we just get one repeated once and the name is shown once. Right? That's the reason why we have it here. But in case if you really want to uh find out the uh data types of all elements here, you can just go through a for loop here and here you have the one value which is integer name value as string 1.5 which is the class and this particular one is called as float here and with that now we enter into the fourth collection or data type which is dictionary in Python. So dictionary is nothing but a key value pair. Let's say you wanted to store some elements inside a dictionary. The only difference with separates dictionary from all the other three data types is it stores the elements in a key value pair. Now let's go through the examples for that as well. Before that let me add up the definition. This is the definition. Dictionary stores data in key value pairs. A dictionary is ordered in modern Python versions. It is changeable. It stores data as key value pairs and keys must be unique which means you cannot use one key for different type of elements. Let's say I try to add uh a key name as ABC and I store some value inside it and again I reuse the same ABC key and store a different value in it. Here what happens is Python will save the latest entry into ABC and it will remove or eliminate the previous entry. You can also go through that example. No worry. Now let's create a new dictionary as student. And here I'll use name of the student. We can use the same name which is Alice and let's say age is equals to 20. Let's add a course for Alice which could be Python. And now you can close the dictionary. Since it is K value pairs, we're supposed to use colon not equals to. And we need to separate them by comma. There you go. Now let's print student. There you go. Now we can make some mild changes to this particular code segment and try to identify the data type as well. Now let's go through this particular element which is defines the dictionary as changeable. So I'll use the same code segment and I'll try to change the name or course of Alice. Let's say I want to change the course from Python to data science. So we have successfully changed the course name from Python to data science. And now if I print student again, the course will be changed here. Now let's say I want to add a new element to this particular dictionary. Let's say I want to add the location. So student. So I've added a new element to this particular dictionary which is location of Alice. Now let's try to print student details. And now we have the city name New York. And now let's say I want to remove an element. So I can use simply the delete command. I can simply use the delete command and the element that I want to remove. We can remove the city which we have recently added and then now there you go. So city was not included in this particular code segment. So that's why it did not recognize. Now let's say if I want to print student once again there you go. City has been successfully eliminated. Now let's discuss about the duplication of keys. Let's say I try to store data or I'll name it as duplication. Create a set. Create a dictionary and then I'll use name is equals to XY Z. Similarly, I'll try to reuse the same code segment. I'll create a duplicate entry and name it as ABC. Close the list. And now let's say I want to print. Yeah, we missed a comma. Let's say I want to print this particular dictionary. Now what happens is it will save the latest entry alone not the previous entry. Now that we are done with the data structures or collections in Python which were set list and dictionaries and tpples we can now dive into the string operations. So we can understand string data structures in a much better way. Let's start with some most commonly asked questions like string slicing or string matching etc. Such type of examples will help us understand what is the basic functionality of strings and how to implement them in real time. So we can start with string functions strings from here. So let's say I want to concatenate two strings. Let's say I have two strings here and I want to combine those two strings. Now let me give the string first one as first name. Remember the uh declaration best practices that we discussed, right? So we will have uh the underscore separating the variable names so that we don't have any blank space or you can also go with this type of uh you know representation but I'd like to go with this one. So first name let's say we will give uh John and uh second name is equals to now let's say I want to combine this together and save it in a new variable which says fill name. So I what I could do is I'll just copy this and I'll paste this over here. And then I'll use the concatenation which is the plus symbol and then we will also use double quotes to save a space there. And then another concatenation symbol which is plus and I'll copy paste second name and I'll place it over here. And then I can just go ahead and write the print command and copy this full name and paste it over here. And you can also add a text saying the combined string result is equals to the first name or the full name. There you go. Run the code and there you go. So you have combined string right here. Now another most commonly asked interview question is you might have to you know find the length of the string. they might give you uh some random text and they will ask you to find the string length of this particular thing. So let's try that as well. So I'll write down a text which says uh let's go with Python programming. This will be our string and uh let's imagine that this is your question and they will say find out the length of this character or length of this string. So let's declare another variable which says length is equals to we will save the string length in this particular variable. Now we will use the length function and we will copy paste this text here inside the length function. Now we will use the print command and uh we will type down length of the given string is length. There you go. The length of the string is 19. Now similarly you can also face another question which says convert to upper case or lower case right convert to upper or lower case. So it's really simple. We can use the same uh string that we have used in the previous example. So you can write down here and then you can directly write down the text as well which says print text in upper case from print text in lower case. So mild functionalities will be you can copy paste this one and change this part and you can paste text right here and you can call the upper function. So dot since we're in lower we'll call lower function first lower function and close the bracket. Similarly you can copy this and paste it over here. You can see how simple the context and syntax is in case of Python. You can just see it. You can just call it as upper and python will automatically understand that the user wants to print some text in lower case and upper case and there is no complexity here as well. There you go. So the text was Python programming and we have I think we have missed an O there. There you go. So let's run the case again. Python programming in uppercase and Python programming in lower case. So, so far we have converted the text into upper case and lower case and we covered three uh interview questions and answers to understand the functionality of strings. Now we can go ahead and understand string slicing as well. So let's say this is the string slicing question and they give you some text. Let's consider text is equals to learn Python with simply gone. This is my text. I'll enter the text in double quotes. Now I want to split uh a part of this text. Let's say I want to print the first 1 2 3 4 5 6 and another six. So let's say I want to print the first 12 characters, right? I want to slice the string into two halves and I want to print the first 12 characters which is learn Python. So the first five is learn space is the sixth what I feel and next is the sixth which is python learn space python are the first 12 characters. Now I want to print these first 12 characters. So I can just copy this print command here and I can say the first 12 are and now here I want to make slight changes. So here I want to make slight changes. So I'll take the text and I'll use a double quote and I'll place a colon and then I want to count the number of characters. So I want 12, right? So I'll just write down 12 and close the square bracket and close the bracket over over here again. Now if I print this, I will have the first 12 characters. Now let's say somebody asks you to print the rest of the string. Let's say I don't want the first uh n elements of the string. I just want to print the next elements of the string. You can also do that. So the only change is you will replace the colon in the first place to the next place and the number of elements that you want to omit. I want to omit the first 12 characters here and then the rest of the characters which are with simply learn I want to print them here. So just a mild replacement of colon from left to right and then that's done. If you execute this we have the rest of the characters which is with simply learn. Now we can go with the next interview question which is can be considered as text matching or you can also consider as text replacement. So first you need to match the text and then replace the text right. So both in one shot text matching and replacing. So the text can be let's consider I like programming. Let's say I like programming in Java is my text. So let's encode this inside double quotes. And now I want to replace uh this particular text which is Java with uh Python. So it is really simple. Uh let us take a new text variable. This is my new text variable. And here I want to use the text replace function. So I'll just take this particular variable text and I'll put it here. And I'll call the replace function. And now I need to provide what needs to be replaced by what. So I want to replace term Java with uh Python. So I'll separate that with common and mention the new term which is Python. And there you go. And now we can just print the new text here. So I'll copy paste the print command and then I'll just call print new text and that should be done. So there is a small error. Okay, I did not write the spelling correctly. So replace there you go. Now we have replaced term Java with Python. So simple, right? You can just identify and then replace the text. Now let's go with another interview question and let's say here I want to find out if a given text element is present or not. We can consider the same text here as well. So let's say I like programming in Java. check if a specific part of string is present. So now this is my text right. I like programming in let's say I'll go with not Java I'll go with Python. So I'll replace Java with Python. Now I want to identify if Python is available in this particular text or not. So this is a little bit early for conditional statement but it's not a big deal. It's really simple. So we will be using conditional statement again. We will be learning a lot of other conditional statements as well or loops as well. So we will be having if l if and else if a lot of those but this is a little bit early but not too complicated. So we will be using if text here or if condition here. If this particular element is present in the text then we can print yes this present this is present in the text no is not identified is not present in the text. So we will go with a simple if condition. So if the term python is available which is in text so this is our text right I'll copy paste this one here if it is available in text and colon then print text is or uh text is found or written element is found else element is not found. So since we are printing the text form of output we will encode this inside double quotes and then we will have l here. So else double quotes, we will use the same print statement. Element is not found. As simple as that. Now let's execute this. There you go. Since we have Python, we have found the element or text. If we replace this with Java and try to execute this, element is not there. So element is not found. Now this was a most common interview question that we dealt with next module which is about operators in Python. So let me uh name it as module 4 which is operators in Python. And since this is a markdown I'll make this as markdown and save it. Now operators are nothing but the mathematical operators or arithmetic operators that you most commonly use in any of the programming language which could be plus minus division multiplication floor division modulus etc. or even sometimes exponents in a very rare case. So let's go through those all those examples in one shot. And most of the time she might also face this interview question where the interviewer might ask you that prepare me um some uh function or something like that which takes the input from my end. Here we will go through an example where we give the input but interviewer may ask you to provide a program that can take the input from the user and then execute the output. So we'll go through all those things in one shot. So uh let me declare a few variables. So let's say a is equals to 10 and b is equals to 20 or two. Let's go with two. And then uh we can directly start with writing the print statement. So I'll write down the print statement. Addition of two numbers is equals to a + b. There you go. Now we can just copy paste this and simply paste a couple of times. And difference of two numbers is a minus b. Multiplication of two numbers is a star b. Division of two numbers is a divided by b. Floor division of two numbers is double slash and exponent of two numbers. Exponent of value of two numbers is just replace the star with double star. And there you go. I can execute the code and you have all the outputs in one shot. There must be an error somewhere. Yeah, we missed out this one. Let's execute again. There you go. So, you have addition, difference, multiplication, floor, division, exponent, and all those things in one shot. Now, coming to the interview question where you might have to go with user input. So, it's really simple again. You just have to declare a couple of variables which take the input along with the input uh command. So let's say I want to take uh two inputs. So I'll declare num one is equals to I just want to go with uh a data type here as well. So let's go with float for the safe side. I want to go with float and I want to go with the input command or input function where it takes the input from the user. So we can give it uh a text message as well. Enter the first number and come close the bracket. There you go. You can copy paste the same code here and paste it. And again we will call it as num to enter the second number. So far so good. Now we can have a third variable which says result and you can name it as predition. So we can use the same quotes from here as well. Instead of a + b, we will replace that with result in close the brackets. And result will have num 1 plus num two. Let's execute this function. So our first number could be 10. Second number could be two. And the result is there. You see? Now you can copy paste the same command or same code and try to perform some subtraction as well. So you can just replace plus with minus and difference of two numbers. There you go. 10 2 8. Now for division, there you go. Now for multiplication, plus will be replaced by a star. There you go. You can also go with the floor division. So I think you already know what is a floor division. So flow division is something where you give an odd number to an even number and it will give you uh just the u uh remainder part without decimal values. Let's say if you try to divide 10 by 3 uh the actual result will be 3 33 3 something like that right but you'll just get three here and apart from that you can okay we did not give a complete flaw division we just gave a regular division so uh let's go with 10 again and three so that's the value you'll just get uh you know the whole number it's like a rounded value of so that's what the floor division is and you can also go ahead with the exponent value as well let's say you just Replace the forward slashes with double stars and you can give exponent exponent value and run. Uh you can give three three three cubis uh 27. So that's how you go with uh the uh user input related mathematical operations in Python. And let me also give you a small assignment here. The assignment would be uh prepare me. Let's consider this as an interview question. You might face this. Who knows? Prepare a small calculator that takes user input and also has an operation that asks for what kind of operation it needs needs to be done. So let's say the user might ask give me the sum of two numbers and might give the input or he might ask you multiplication of two numbers and give the operation as multiplication. Right? That's the kind of uh output that we want. So this is your assignment. Consider this and do let us know if you want the answer or do let us know if you already found the answer. You can paste that in the comment section below. Now we will enter into the module five which will be conditional statements and you can also combine loops as well. This is a module five and loops. Conditional statements and loops. Since this is a markdown cell, I'll replace this to markdown and execute the cell. And there you go. So we will be having if statement and we will also have if else statement and we will also have nested if or in this condition we will call it as l if and apart from that we will go through a couple of more like uh for loop while loop etc. for loop statement while loop and all those things. If we have missed out anything we'll go uh for it on the go. So far so good. This is our uh quick agenda for module five. Correct. So these are the uh common conditional statements or loops that we will be facing. But um we will also learn these in a perspective where we are trying to question something. Let's say if you want to go with the if statement uh we can go with theory. If functions like this you'll have a condition if this satisfies then that. But in instead of that theoretical approach we can go with a practical approach so that you can understand in a much better way. Let's say we consider an example. We have a variable which takes the input from the user which is a numerical value and if that particular numerical value is negative then that is a negative number. If it is equals to or greater than zero then it should be a positive number. So you are kind of understanding how it goes right. So let's try that example with if condition. So let me take an example or we can take this particular code from here and just try to place it here and uh we will uh name it as num and we'll take uh integer type of input and the enter the number. This would be my condition and this would be my message to the user. And now comes my condition. If number is greater than or equals to 0. Basically it should be uh greater than 0 not equals to 0. But in case if somebody gives zero that could be we can go with that in an else if condition but for now it's okay. Uh print the text as so this is my condition. Now print number is positive and close this. So since it's a text type of output, so I'll enter it in double quotes. So we didn't mention an else condition just for the sake of understanding how an if works. Now I'll press some number is positive. Now we'll go with the if else statement here so that we understand what happens if somebody gives me a negative input. Right? So I'll copy paste the same code and now we will proceed with an else statement here. else print we can use the same code as well number is negative right let's enter and now let me enter some number as minus 19 so the number is negative so that's how an if and else statement works now we can proceed with another uh statement where you can have nested if statement or in common terms we can also call it in terms of python as l if statements so let's copy paste the same command and here and paste it over here. And uh instead of numbers, let's mark it as marks in an exam. And we can go with the float data type and enter the marks. If uh marks are greater than equals to 90, I would say class as distinction and l marks are greater than equals to 65. I'll deem it as first class marks are greater than equals to 45 then we can de as second class another l if 35 then pass and the last option where this particular loop should close or conditional statement should close is where comes the else part and here I can print fail there you go now we can quickly execute this statement let me get some marks which are fail so there you go fail and if I execute again And if I give about 91 marks then I got distinction. So this is how the multiple else if statement or the nested else if statement or lf works in Python. Now we come across the rest of the two condition statements which is a while loop and a for loop. So let's go with for loop first and while loop next. So I'll go with for loop. We need a small let's go with list. I want to add the same fruits example and I want to enter a couple of fruits. Let's say apple. Then I want to use grapes. Then we can go with mango. So these are the couple of uh elements which I want to have in my list. And now I want to print these elements. So for that we can directly go ahead with the print statement. But in case if I want to print them one after the other then I need a counter variable and using that counter variable the control flows through this particular loop one time at a time until all the elements are printed out. So for that let me assign a counter variable. So in normal terms we can use any counter variable. So I let me name it as I as my counter variable. Let me comment this. I here in this code is a counter variable which basically maintains the count of uh the number of times the control went through the loop. Now let me write down the for loop for this. So for i in the list fruits print i. There you go. So I missed a colon here. Indentation problem I guess. There you go. So we have printed apple, grapes and mango. So whenever you're writing a loop, make sure that you don't miss this particular part which is a colon and the indentation. So if you miss the indentation and colon, sometimes the error may pop up. Now with that, let's dive into the while loop. So you can use the same condition here. We can also uh make use of another example. Let's say somebody asks you a question to print five numbers using a loop statement. So you can use while loop there. So while loop so I mentioned that in a comment. Let's go with a counter variable. So I'll mention it as count is equals to zero and while count is less than five. Again I missed the colon there. Count and count should be you know uh it should be increasing every once it goes through a loop statement. So equals to + one. So count is equals to count plus one. Basically every time a loop runs you need to increase the value of count by one. So zero becomes one after the first loop then two and so on. So I want this loop to run for five times. So I will have five elements. So once you execute this while loop we have the first five elements printed here. And if we had declared some other variable to this count then we might have got the five counts from there. So it's how it goes. Now uh we have also a couple of u common interview questions based on conditional loops and loop statements here as well. You can go through this. We can share this particular workbook in the comment section below. And let's say if we wanted to find out a number is even or odd, you can also do that. Let's say I want to provide a number which is odd. So if the modulus of the number is resulting in zero, then that particular number is even. If not, it is an odd number. And you can also print uh some couple of number uh let's say start from 1 to 10 then you have it here. The only thing is you need to declare the variables range here. Let's say I wanted to print from 10 to 110 or let's say 20 and I have to change the input variables here and I'll have 10 to 20 or 19 variables or numbers resulted in this particular section right here. And let's say if you wanted to find out the largest number of three which we already done with the lf statement uh you know kind of resulting in mass what's the output. So here you just change that particular instance here you can declare three different variables and it takes three different inputs and based on that you will get the output. So let's say I give the first number as 10 second number as 20 and the third number as 30. So the same l if statement works here. The nested else if statement works here. If a is greater than b then b is greater. If b is greater than a or c there. So there you go. Largest number here is 30. Now here we have print multiplication table using a loop. Right? And here you need to provide the number. Let's say I want to go with five. And the five table is right in front of my eyes. And count numbers greater than 50 in a list. So there you go. And now we have the list here and based on then the any element which is greater than 50 is 55 and 60. So we have 89 as well. So we have three elements which are greater than 50 in this particular list. Let's say if let's say if I add another number or two. Then I run this command again and I want to find out how many number of elements are there in this list which are greater than 50. Then I'll get the result as five. So we have about 55 60 89 90 and 67. the find numbers which are greater than the given number which is 50. So these are a couple of more interview questions we can go ahead with in the form of conditional statements and loops. So this particular workbook will be shared with you and apart from that now we enter in our last module which is object- oriented programming. So object-oriented programming is usually the next step in Python fundamentals because it teaches you how to organize code into reusable and scalable components. So uh the core components of object-oriented programming are classes and objects and apart from that we have encapsulation, inheritance and polymorphism. First let's go with classes and object. So a class is a blueprint for creating any object and an object is the instance of a class. Let's consider it in this way. A class let's go with the blueprint example. Let's say you build a very nice blueprint to create a device or a mobile for a computing device like a laptop or something like that. And once you have a finalized blueprint, you can create any number of devices out of it. The same way if you have a completely structured class for you, then you can create any number of object out of it. So in our case, we have a class with state student and the object that we yield out of this class student is this one s1 right? S1 is the first uh that we're creating here and student is the class and s1 is the object created around the class. First we were supposed to create the class first and then if we run the object then we have the object creator which is John H22. Now comes the important part the init constructor. So the init method is the constructor used to initialize object properties. Whenever you declare a class and then if you want to create an object out of the class you need something to initiate the process of building an object. So that is the init constructor here and let's run this code. So that we have created a class and use the init process and assign the object which is Alice age 21. Now comes the encapsulation which is one of the fundamental pillars of object- oriented programming. Encapsulation as the name speaks for itself. Encapsulation means restricting the direct access to some variables. In Python this is commonly done using private variables. So here we have the bank account class and inside the bank account class we have the init method, deposit method and the show balance method. So we will be calling these methods and executing our outputs. So let's execute this code and see the output. So there you go. So the initial balance was 1,000 rupees or 1,00 INR and then we are trying to call the deposit function and add the balance to it which is right here. Uh balance is equals to plus the amount. The amount was 500 and the final balance is 1,500 as you can see here. And now we come into the inheritance which is the next pillar in object programming. Inheritance allows one class to reuse the properties of another class. And here we have two classes which is employee class and the manager class. And then we have the developer class as well. So here we will be using the properties of the employee class and display the employee details and their salaries. So let's run this code and call the output. There you go. So the employee is Alice and her salary is 90,000. Alice approved the leave request and the employee was Bob and his salary 70,000 and Bob is writing the Python code. Basically, he's a Python developer. Now we come across polymorphism and polymorphism allows different classes to use the same method name with a different behavior. So here you can see we have a method definition which is named as pay. But the classes are credit card payment, PayPal payment and UPI payment. All these three classes have the same method which is pay and the name of the method is also the same but based on the function call the method will be initiated. Let's say I want to call payment from a specific class. So if I call the uh credit card payment class then this particular payment method will be activated or called and if I call from PayPal class this particular payment method will be activated and same goes for UPI. So let's try to call all those three in one go. There you go. So you see certain amount was paid using credit card, certain amount was paid using PayPal and certain amount was paid using UPI. So this is how you can go through the object-oriented programming in Python. Now don't worry, we will have this uh complete Python tutorial notebook saved for you from starting to the beginning. Right? So this is where we started and this is where we ended. All these code documentations and the code segments will be saved. We will download this and we will share it with you so that you can have access to it and this particular file will be mentioned in the description box below. So you can download it and run it through your Jupyter notebook and follow along with us. And with that we have come to an end of this session on Python tutorial. Let's see what operators are in Python. Now operators are generally used to perform operations on values and variables in Python. These are standard symbols used for logical and arithmetic operations. The value that the operator operates on is called the operand. So here on your screens you can see the different types of operators available in Python. First we have arithmetic operators. So arithmetic operators are used to perform mathematical operations. It returns either true or false according to the condition. So these are the comparison operators. You have less than, greater than, less than equal to, greater than equal to, we have not equal to and we have equal to equal to. Third, we have assignment operators. So assignment operators are used in Python to assign values to variables. So these are the assignment operators. You have equal to, you have plus equal to. So for example, you have a variable called x. And if you say x + = 7, this means it is x = x + 7. Similarly, if you say x -= 7, this means x = x - 7. And similarly, you can see the other assignment operators here. Next up, we have the logical operators. So, logical operators are used in the expression evaluation to make a decision. If both the expressions are true then the condition will be true for an and operator. For an or operator if one of the expressions is true then the or condition will be true. Now for not. If an expression a is true then not a will be false. We also have bitwise operators. So bitwise operators act on operants as if they were strings of binary digits. It acts on bits and performs bitby-bit operation. So hence it is called bitwise operator. So here each value is evaluated as zeros and ones. Then we have identity operators. So identity operators are used to check if two values are located on the same part of the memory. Two variables that are equal does not imply that they are identical. We'll understand each of these operators in the demo session on the Jupyter notebook. And finally we have membership operators. So membership operators are used to test whether a value or variable is in a sequence. So you have is and is not as identity operators. In membership operators we have in and not in. Now let's head over to our Jupyter notebook and we'll see and explore all these operators one by one. So I am on my Jupyter notebook operators in Python. So let's first start with arithmetic operators. I'll just give a comment here saying arithmetic operators. Okay, first up we'll see the addition operator. For that let me assign two variables. So I have assigned a variable x to a value 10. And let's say we have the second variable y equal to 4. Now if I say print x + y, it will perform an arithmetic operation that is addition and will sum the result of x and y and gives me 14 because 10 + 4 is 14. Then let's say I'll write print x minus y that gives me 6 because 10 - 4 is 6. Similarly you can have multiplication as well. So I'll write x asterisk y that gives me 40 because 10 * 4 is 40. Similarly, let's say x divided by y. It gives me 2.5, which is basically the quotient of these two operants. All right. Now, if you were to find the remainder, you can use the modulus operator. So, I'll write x modulo y. It gives me 2. So you divide 10 by 4 the remainder is 2. Now you can use the double asterisk operator which is basically known as power. So the left operint is raised to the power of right. I'll write print x give two asterisk and then say y it gives me 10,000. So what basically Python does is it will raise 10 to the power of 4. So 10 is multiplied four times and the result is 10,000. You can also try out another example. Let's say 2 raised to the power of 4. This gives me 16. If I say 2 raised to the^ of 3 that is 2 cube and the result is 8. You can also perform flow division. So flow division results into whole number adjusted to the left in the number line. So if I write print x and flow division is given by two forward slash then I'll write y that gives me two. So it returns a whole number. A generic division gives me 2.5 that has the floating point value. But a flow division will give me a whole number adjusted to the left on the number line. All right. So these are some of the basic arithmetic operators that are very popular in Python. Next we'll move on to assignment operators. I'll give a comment as assignment operators. Okay, let's assign a value x equal to 7. So here we are assigning the value of 7 to x and your equal to is an example of assignment operator. Now if I print x, it will give me 7. Now let's say I'll again write x = 7 and in the next line I'll write x + = 3 and we'll print x. So what python does is it adds three to my original value that x holds that is 7. So here x + = 3 means x = x + 3. So x = x + 3 can be written as x + = 3. Similarly you can also write x -= to something say x= 7 and then I write x -= 3. Then we'll print x. This gives me four because we are subtracting the original value of x by 3. So here x -= 3 means x = x - 3. Okay. Similarly, let's say I'll write x asterisk equal to 3. If I run it and print the value of x, it gives me 12 because our previous x value was four. And now we have multiplied x by 3. So x value now becomes 12. Let's say I'll write x divided by 3 and I'll print x. It gives me 4.0. This is a floatingoint number. So we are dividing 12 by 3 and the result is 4.0. Cool. If you want you can also perform an exponent operation or a power operation. So let's say I have x = 7 and then I write x double asterisk equal to say 2 and then we'll print x. Okay, there is an error here. Let's debug the error. I have put a space here. Let's delete that space. You have to keep this in mind. Now let's run it. There you go. So 7 raised to the^ of 2 which is basically 7 squared is 49. You can change the values and run other examples. Let's say 10 raised to the power of three. We have 1,000 as the result. Okay. Now moving ahead now we'll understand about comparison operators. So I'll give a comment as comparison operators. Okay, let's say I have x = 7 and then I have y = 3. If I print x = to equal to y, it will give me false. The reason being the value that x holds is not equal to the value present in y. These are two different values that x and y hold. So x is not equal to y. And if you print x equal equal to y, it will give us false. Now I'll just copy this code. I'll print it here. And instead of equal to, I'll give not equal to. So not equal to is represented by an exclamation mark followed by an equal to. If I write x not equal to y, this gives us true because x and y are two different values and they are not equal. I'll print my code again and this time let's say I'll write x greater than y it gives us true because 7 is greater than 3. If I write x less than y and hit shift enter that gives me false because 7 is not less than three. I'll print the code again. This time we'll see if x is greater than equal to 3. If I run it, it is true because 7 is greater than equal to 3. And now let's check for less than equal to. This is false because 7 is not less than equal to 3. Okay. So these are some of the basic comparison operators that are available in Python. Now moving ahead, we'll see how logical operators work in Python. Okay, first we look at the and operator in Python. Suppose I have a value of 7 stored in X and then I have a value of 12 stored in Y. If I write print X greater than 2 and Y less than 10. Let's run it and see the result. It gives us false. Now and logical operators will return true if both the conditions are true and it will return false even if one of the condition is false. So here x is greater than 2 which means 7 is greater than 2 is true but y less than 10 which is 12 less than 10 is false and hence our entire expression becomes false. Next, let's say I have x= 5 and then I'll print x greater than 3 or x less than 10. If I run this, it returns us true. The reason being x greater than 3 is true, which means 5 is greater than 3. That is true. But five is not less than 10. But since one of the conditions is true, so the or operation in Python returns us true. Now let's see another example. I'll write x = 5 and y = 10. I'll print x greater than 10 or y less than 20. If I run this, it returns true. So let's see our expression. x greater than 10 that is 5 greater than 10 is false. But y less than 20. So 10 is less than 20 is true. So our or operation will give us true since one of the condition is true. Now moving to the next logical operator we have not. I'll give an comment here as or. And now we'll see not. Let's say I have x= 5. And then I'll print x greater than 3 and x less than 10. This should ideally give us true. The reason being x is greater than 3 and x is less than 10. Let's run and verify. Okay, so this is true. Now let me copy this and I'll paste it in the next cell. Now I'll replace my above print statement with a not operator and we'll close our print function with another bracket. Now let's run it. So this will give us false because my expression evaluates to true but not true is false. Okay. Now moving ahead, let's discuss identity operators in Python. All right. So we'll start by assigning a value of let's say 505 to X and then in Y I'll have 500 + 5. So which is also 505. So x and y hold the same value of 505. Now I'll print x, y. So you can see here both the values are same 505 for x and y. Now I'll use the logical operator that is double equal to or equal to equal to. I'll write x equal to equal to y. This will give us true because x and y hold the same value of 505. But let's check with the identity operator. So I'll write x is y. If I run this, it gives me false. The reason being x and y both refer to objects whose value is 505. They are equal but they are not referencing to the same object. Now this you can verify using the ID function in Python. If I write ID of X, this will give me the memory location that X has. You can see this is the memory location of X. If I write ID of Y, there you go. So this is a separate memory location in which Y is holding the value 505 and hence X is Y is different and hence it is false. Now suppose I write x= 100 and I have y = 200. If I write x is not y. This gives us true. The reason being x and y both are holding different values. So x is not y is true. Let's see another example. This time we'll define two lists. So I have a list called A that has value let's say 5A 6A 3A 7A 1 comma let's say 9. And then I'll have another list that will also have the same elements. I'll copy this and I'll paste it here. Okay, if I write C equal to A and then we'll print A is C. If I run this, it gives us true because we are assigning the variable A to C and hence the memory locations are the same for both and hence A is C gives us true. What if I write A is B? Now this gives us false. So here a and b are both less. They are equal but not identical. It is because the interpreter in python allocates them separately in memory although they are equal. Okay. Now let's talk about membership operators in Python. I'll give a comment as membership operators. Okay, let's see. I have a list A that has the above values 5 6 3 7 1 and 9. I'll copy this and I'll paste it here. Okay, I have another list B that has different types of elements. We have four. Next element is Python. Then we have two comma 7 comma let's say simply learn and then I have 9. I'll run this first. So I have my two lists A and B. I have printed them. Let's explore how the membership operator works. So we saw in the slides in and not in are two membership operators. If I write five in A and run it, it returns me true because you see here five is present in A and hence five in A will return true. What if I write 55 in A? This gives us false because you see here in the list A, we don't have an item 55 in A. So it gives us false. What if I write four in B? This gives me true. You see here in B we have the element four. So 4 in B is true. One thing I wanted to show you is what if I write Python in B. You see here it gives us false. Though we have Python in our list B, but the Python I'm trying to check is not present in B. The reason being here Python is written in lower case but what I'm checking Python P is in upper case so it is case sensitive and hence this gives me false let's say I'll declare a dictionary Y equal to and within curly braces I'll give my key a and I'll assign the value of India. Let's say I have another key B and that has a value let's say USA. Now if I check A in Y, it gives me true because your key A is present in Y. Now what if I check India in Y. Now this gives me false. So here the membership operator won't work on the values. It only works on keys in a dictionary. Now let me go ahead and change the keys to numbers. I'll give one that has India and the second key I'll have two. Now if I change a to one it will work fine. It gives me India. But if I write USA in Y it gives me false. As I said the membership operator won't work on the values. It only works on the keys in a dictionary. Cool. Now coming to the final section of our demo. we'll explore about bitwise operator. Okay. So, Python bitwise and operator returns one if both the bits are one otherwise it will return zero. So, first let's see 7 amberscent 2. If I run it, it gives me the value of two. So what Python does is it will first convert the numbers 7 and 2 to their binary equivalents that is in the form of zeros and ones and then it will perform the bitwise and operation. So 7 amberscent 2 the value is two. If I write 3 amberscent 5 the value is 1. Again it will first convert three and five to binary equivalents in the form of zeros and ones and then it will perform the and operation the bitwise and operation. Now the Python bitwise or operator returns one if any of the bits is one. If both the bits are zero it will return zero. So if I write 10 or five, it gives me 15. So first it will convert 10 and five to binary equivalence and then it will perform the bitwise or operation. Let's see another example. I'll write four or 8. I'll run it. So the bitwise or operation gives us 12 as the result. All right. Conditional statements in Python perform specific operations and take actions depending on whether a specific boolean constant evaluates to true or false. Conditional statements are handled by blocks of if statements in Python. Now, conditional statements are also known as decision-m statements. So, Python provides different types of conditional statements that you can use to make decisions. We have the simple if statement. Then we have if else statement, l if statement, the nested if statement as well as nested if else statement. We will learn them one by one with the help of their syntax and code examples. So this is how the syntax of if statement looks like. So you pass in the if condition and then we have a set of statements inside the if condition. So on the right side you can see the flow diagram how the if statement gets evaluated. So first we have the test expression that is the if condition. Now if this expression evaluates to true then we go inside the body of the if statement. So this is basically the body of the if statement that contains a list of statements or blocks of statements. Now if the test expression evaluates to false, we execute the statements that are present after the if condition. All right. Now let me take you to my Jupyter notebook where we'll understand if statement with an example. Okay. So here I am on my Jupyter notebook. I'll just rename this to conditional statements. I'll see it as demo and we'll rename it. Okay, I'll just expand the screen size. All right. Okay. So, first of all, let's write a simple if statement. I have given a comment here. Suppose we have a variable called grade. and the value of grade is 80. And I'll write my if statement as if grade is greater than equal to 50 then I'll give a colon then I'll write a print statement print passed in the exam. Now this is how you write a simple if statement. So you have the if keyword followed by the condition. So here my condition is I'm checking whether the grade is greater than equal to 50. Now here I have already defined my grade to 80. So this if statement or the if condition will check whether 80 is greater than equal to 50. Now this is true. Then my print statement gets executed. Let me run it and show you the result. There you go. Here you can see we have our printed message as passed in the exam because 80 is greater than equal to 50. Now what if I change this to let's say 30. If I run this, there is no output here. The reason being 30 is greater than equal to 50 is false. So my print statement did not execute. Okay. Now if you want you can also print another statement outside the if condition. I'll give the message as execute statement after if. Now one thing to remember that this print statement is outside the if condition. So if I run it, only my last print statement gets executed which is outside the ifs condition. Okay. Now let's write another simple if statement. Now this time we are not going to define the grade value or predefine the grade value. Here we are going to take the grade value as an input that is a user input. So I'll write grade equal to. Now the way to take a user input is by using the input function. So first of all we need to convert our entry into an integer. So I'll write int function and inside that I'll pass in my input function. Then I'll give my message as enter the number. All right. So this statement will take the number from the user. Now I'll write my if statement. If grade is greater than equal to 50 then it won't give a space here. Let's delete the space. Then I'll write print you have passed in the exam. Okay, let's run it. You see here my program is asking for the user input. It says enter the number. I'll give my number as let's say 60. If I hit enter, that gives me the result passed in the exam. Now let's run it again. This time I'm going to give as let's say 35. If I run it, there is no output here. The reason being our grade 35 is not greater than equal to 50. So our print statement did not execute. All right. Okay. Okay. Now let me give a space here. We'll run it again and this time we'll pass our grade as let's say 75. Let me run it. You can see here it gives me the message passed in the exam. Now moving to our next statement. We have the if else statement. So this is how the syntax of if else statement looks like. So first you have the if condition followed by a colon. If this condition evaluates to true, then we execute the list of statements that are present inside this if condition. Else, we have the else block here. If this condition returns false, then we execute the list of else statements. So here is the flow of how the if else statement executes the different statements. So first we check the test expression. If that evaluates to true then we have the body of if and if it is false then we have the body of else and later there are any statements that are present outside the if else block we'll execute those statements. Now let's head over to our Jupyter notebook and we'll see how the if else statement works by example. Okay. So here I'll show you another example of using two if statements. So I'll define my grade as 40. I'll write if grade is greater than equal to 50 then we'll print let's say pass then I'll write another if statement I'll say grade is less than 50 then we'll print fail. Now here I'm using two if statements. Let me run it. You see here I have my result as fail. The reason being our grade 40 is less than 50 and hence it has printed fail. Now instead of using two if statements you can use the if else statement. So in this case we'll have our if statement checked for if grade is greater than equal to 50. If this is true then we'll print whatever is there inside the if statement. But in case this evaluates to false we have another else block that we are going to write. Let me show you how to write the full statement. So I'll give a comment as if else. Okay. I'll say grid equal to 40. Then we'll check if grid is greater than equal to 50. Print pass. Then instead of using the if statement again, I'll write else followed by a colon and then I'll write print fail. Make sure this fail is inside double quotations. If I run it, it gives me the result fail. The reason being 40 is not less than repeat 40 is not greater than equal to 50. So hence it has printed field. Now instead of taking the value as 40 we can have the user give the input. So we'll use the input function. I'll say enter the grade. Let's run it again. You see here my program is asking for the user input. Let's say I'll give 80. We'll run it. It says pass because 80 is greater than equal to 50. Let me run it again. This time let's say I'll pass my grade as 45. We'll run it. It gives us fail. All right. Now moving to our next conditional statement, we have the L if statement. Now this is how the syntax of L if statement looks like. So here first we have the if condition. Now if the if condition evaluates to true, we have the body of if there is basically a set of statements. Now if the first test expression or the if condition evaluates to false, then our L if condition gets executed. Now if our L if condition is true then we have the body of L if. So this is the L if statement body. Finally if the L if condition also evaluates to false then we have the block of else statements. You can see here we have body of else and later if there are any statements outside this if l if and else block then those statements get executed. Now we'll see this with the help of examples. Okay. So here on my cell I'll give my comment as l if statement. Okay. Suppose I have a variable called score and this take the value as integer from the user. So I'm using the input function. I'll say enter the score. I'll give a space. then I'll write my if condition. I'll say if score is let's say greater than equal to 90 give a colon then we'll print our message as passed the exam with let's say a grade I'll just copy this statement because we are going to print similar statement below as well and Now I'll have my L if condition. I'll write L if l if is actually else if score is greater than equal to let's say 75. I'll give a colon. We'll print passed the exam with B-grade. Then I'll again have my L if statement. I'll write if score is greater than equal to let's say 60 will print pass the exam with C grade. Next let's write another L if condition. I'll write l if score is greater than it should be greater than equal to okay it's greater than equal to let's say 40 then we'll print pass the exam with dgrade and finally we'll have the else condition I'll write print let me just scroll down failed in the exam. Okay. So this is how you write a l if conditional statement. So first I'm taking the user input of the score. Then I'm checking if score is greater than equal to 90. I'm displaying my message as passed the exam with a grade. Then I have a list of l if statements to check for different scores. If all these evaluates to false, I am having my else statement printed. Let's run it. Okay. So we'll try out different scores. Let's say someone scored 95. If I run it, so that candidate has passed the exam with Egrade because if you see the condition, my score 95 is greater than equal to 90 and hence we have passed the exam with A grade as the message. We'll run it again. Let's say I have 80. If I run it, it says pass the exam with B-grade. The reason being 80 is greater than equal to 75 and hence we have this message printed. Let's run it again. Suppose someone scored let's say 25. If I run it, okay, it throws me an error. It says name score not defined. Okay, so this should be score actually. Okay, there was a spelling mistake. I'll run it. I'll pass my score as 25. It gives me failed in the exam. The reason being my score 25 is less than equal to 40 and hence we have failed in the exam. Cool. Now you can also use a for loop and then have a list of if else block or if else statements. Let me show you how to do it. Suppose I write for x in I'll use the range function. I'll go till 10 which means from 0 to 9. Then I'm checking if my x is less than equal to 3. I'll print x is less than or equal to 3. Okay, now we have the L if statement. If L if X greater than five, I'll print X is greater than five. Then we have the else condition. We'll print. Let me just scroll down. I'll print x must be four or five. Okay. So here I have used a for loop and I am checking for each iteration from 0 to 9 and then we have a set of if l if and else statements. Let's run it. There you go. You can see the output here. So first in my range I have zero. So it will check if 0 is less than equal to 3 which is true. So it has printed 0 is less than or equal to 3. So it will go till three and then when four comes it will check if four is greater than five. Now this is also false. So it will skip executing the L if statement and it will print whatever is there in the else block which is four must be four or five. So you can see the message here four must be four and five. Similarly for five also the same message will be printed. The reason being five is not greater than five. And then for the rest of the numbers from 6 to 9 we have 6 is greater than 5, 7 is greater than 5, 8 is greater than 5 and 9 is greater than 5. All right. Now moving ahead, next we have the nested if statement. So here is the syntax of nested if. So you have the if condition and inside the if condition you have another if condition and hence it becomes the nested if condition statement and inside this condition you have the list of statements or the blocks of statements. So here is how the flowchart or the flow diagram looks like. So first we are evaluating the expression one which is this condition. If it is true we are going inside and checking the second condition. If that is also true then we are running the body of a which is this part of the syntax and later if there are any statements that are present outside the if condition we are executing those. So in case the first test expression evaluates to false we are coming outside indirectly printing whatever is there outside the if condition. Let's see this with the help of an example. Okay. So I'll give my comment here as nested if cool. So first of all I'll declare a variable called num. Now this num will have a user input value. So I'll write input enter the number. Then I'll have my first if condition. I'll say if number or num is less than 250 I'll give a colon then we'll use the print statement num is smaller than 250 I'll write my second if statement and we'll check if num is less than 180 and we'll print num is smaller than 180 as well. Finally, I'll have my else statement as print number is greater than 180. All right, let's run this. And first we'll check with the number 100. Okay, there you go. So here I'm checking whether 100 is less than 250 which is true. So we have printed 100 is smaller than 250. Again we are checking if 100 is less than 180 which is true. Again so we are printing 100 is smaller than 180 as well. There's a spelling mistake. Okay. Now let's see for let's say 150. Again we have 150 is smaller than 250. 150 also smaller than 180. Let's run it. This time let's say we'll pass 300. Okay, you can see our result here. 300 is less than 250 is false. So we'll skip printing this again. We'll check whether 300 is less than 180 which is false again. So we'll skip printing this statement as well. We'll only have our else block printed which is 300 is greater than 180. Okay. Now coming to the final section where we'll see about nested if else. So here you can see we have the syntax for nested if else statement. So we have an outer if condition and inside that we have another if condition. Then we have the list of statements or the body of the if condition. If this is false then we execute the else part. And after that we also have an outer else statement. So this is how the flow diagram looks like. We'll check for the test expression one. If that is true then we'll go inside and see the test expression two. And if that is true we'll execute the body of if statement which is this part of the syntax. Then if these are false then we'll see the body of else one. If the second expression is false, then we go to the body of else two. And after that, if there are any more statements, we'll execute them as well. All right, we'll see an example here. So, I'll give my comment as nested if else. Okay. So, I'll declare a variable a which will take a user input of type integer. I'll say enter the number. I'll write if a is less than 50. So this is my first if condition. If this is true, this should be less than 50. Okay. So if my first if statement is true then we'll check for the second if statement which is let's say if a modulus 3 equal to equal to zero which means if the remainder of the division is zero then we say print a is divisible by 3 and is less than 50. Okay. Then we have our else statement as else. Print my number a is not divisible by three but is less than 50. Finally, I'll have my last else statement where I'll print my number a is greater than 50. Okay, so this is how you write a nested if else statement. So I'm taking my number as a user input. First I'm checking if that number is less than 50. If that is true, I'm again checking if that number is divisible by three. If it is divisible, I'm printing my message as the number e is divisible by 3 and is less than 50. If this is false, I'm saying the number e is not divisible by three, but it is less than 50. Else I'm saying the number is greater than 50. Let's run this and we'll try out different examples. Let's say I'll say my number is 12. My message is 12 is divisible by 3 and is less than 50 which is this part of the code. So my number 12 is less than 50. This is true. Then I'm again checking whether 12 is divisible by 3. It evaluates to true and hence we have this result printed. Okay. Let's say this time I'll say 30. So I have my message 30 is divisible by three and is less than 50. Let's run it again and this time let's say we'll say 72. So here I have my message 72 is greater than 50. The reason being 72 less than 50 is false. Hence this part of the code is not executed. It will directly come to the else part which says 72 is greater than 50. Okay. So that brings us to the end of this demo session on conditional statements in Python. So first we learned how to write simple if statement. You saw how to take inputs from the user. We also learned how to write if else statement. Then you learned about if statement. You also saw how to use a for loop. And inside that you can use your if statement, your l, your else. Later on we saw how to write nested if statements. And finally we learned how to write nested if statements. Let's glance at the topics. Object- oriented programming in Python. Some major principles of object-oriented programming. And then we will touch upon topics like class in Python, objects, methods, inheritance, uh the concepts of inheritance, the different type of inheritance, then the definition and examples of polymorphism, encapsulation and abstraction. So all these topics will be supported with examples and the relevant terminologies and definitions. Now what is object- oriented programming? Pro Python is an object-oriented language like any other programming language like Java, C++ and the object-oriented programming language concept is not new and each and every mature programming language has these concepts embedded in it. Now the concept of object-oriented programming in Python focuses primarily on creating project objects and making reusable codes. So whenever we start programming at a large scale or for a big project, it is very important to identify the objects within that particular project which you want to define. Now for example in this uh in this uh presentation what you are seeing is that we are covered with full of objects like car, dog, tiger, tree or a balloon. So these are typical examples of objects which you encounter in day-to-day life. Now what are the major principles of object-oriented programming? So these are the different kind of uh you know terminologies classes are there. There are objects there are methods. Then on these classes and objects you apply inheritance polymorphism encapsulation and abstraction. Now [clears throat] what is a class? Class is nothing but a collection of objects or we can say a userdefined data type. Right? So basically it's a complex data type which has a collection of objects and within the objects you have primitive data types like int, string, uh float etc. So a class also holds the methods the functions which basically perform operations on these objects. Right? and also it also holds on to the attributes of the objects. So let's see with an example right. So if you have an employee class then it would contain attributes and methods such as email id, name, age, salary. These are the attributes and the methods like you know perform task, give presentation, increase salary etc etc. These are will be the methods. Now let's talk about what are objects in Python. Now object is known as instantiation of a class. Right? An object is a group of interrelated variables and methods. So when a class is defined only the description for the object is defined. Therefore no memory or storage is allocated at that point. So for example if you see in this motorbike is a class but the different objects of that class are different kind of bikes by different brands like BMW, Suzuki, Royal Enfield and field. So they all have inherited the attributes of the class motorbike and then on top of it defined certain variables additional variables and methods uh on top of it to enhance the motorbike and make it look different or or function differently. Now what are methods in Python? Methods are functions defined inside the body of a class. Right? So basically methods are something which like which you which you perform on a uh attributes of a class. Right? Method is a function that that is associated with an object. So you create an object of a class and on that object then you can execute those functions. In Python a method is not unique to class instances. Any object type can have methods and the methods define the behavior of an object. So that's why a BMW motorbike will be different from Royal Enfield because the behavior is different. The methods are different. So if you see the example over here you have a class bike and in that there is a init function which will get invoked when you initialize the object of class bike and then you can set the brand name and the year of manufacturing for that particular object. Now inheritance what is inheritance? Inheritance is something which you derive from a parent. So inheritance is like creating a new class that uses all the properties and behavior of another class. Now the new class is called the derived class or the child class and the existing class whose properties are inherited is known as a base class or parent class. It provides and the basic functionality the usage of inheritance is that reusability of code. So if anything is defined in the parent class then you don't need to rewrite that particular code in the child. You can just inherit it. So as I mentioned let's take a look at the different types of inheritance which are available. You have single level in which only one child is inheriting uh the properties and the attributes from the parent. Then you have multilevel in which first child has inherited from the class A, class B has inherited and then you have another class C which is inheriting from class B. So this is an example of multi-level and we will be supporting all these concepts with an example in our Python uh notebook. Then there is hierarchal. Then there are two different classes which are inheriting from a single class and then multiple inheritance. That single class is inheriting from two different parents. So these are different set varieties of inheritance bases. What is the demand? What is the business requirement? You can define. Now what is polymorphism? Polymorphism in Python what does it means? Polymorphism consists of two words poly and morphs. Poly means many and morph means shape. So basically it means a many shapes. So it is it means using a familiar interface for multiple forms right. So you can use a single name of the method and which can perform different behavior based on the object in which it is invoked. So in simple terms we understand that a task can be performed in various ways. Let's support it with an example like you have a plus operator. Now the plus operator can be used for integer data types to perform arithmetic operations. Whereas when you use plus operator to in string data types it can be used for concatenation. So it's a very typical example, very uh good example in terms of how an same operator can behave differently bases what data types are being used. Now let's talk about encapsulation using oops in Python we can restrict access to methods and variable. So basically in in Python you can you can create something like as private variables but of course you can't use a private keyword unlike Java. So in in uh Python we use underscore or double underscore in order to define private attribute. So basically these attributes can be only used within the class and cannot be exposed outside a particular class. So we will see this with an example. Now what is abstraction? Data abstraction and encapsul encapsulation are often used as synonyms. Abstraction is used to hide internal details and show only functionalities. For example, you know how to turn on or off a light using a switch, but you don't know what is happening behind socket. Similarly, an abstract class cannot be instantiated. Which means you cannot create objects for this class. You can only define the methods which have to be implemented by the classes which are inheriting the abstract class. So basically abstract class provide only the method signatures and rest the other functionalities and the implementation has to be done by the child classes. So let's now move to the our Jupiter notebook and we will start performing certain examples. Now as we are saying like Python has objects. So let's create a object. We will create a class bikes over here. And within the class we will define the init method and in the init we will instantiate two variables brand name and Yeah. Now we will create an object of bike which we will we are calling as BMW and another we will create an object called ducarti. So what we are doing in this two scenarios is that we are just instantiating the bite bike object with variable BMW and Ducati. We are instantiating. Now let's print the year and manufacturing year the brand name and the year for BMW and for Ducati. And let's see right so what we have done is we have created an object for bikes one we are calling BMW and one we are calling Ducatti and how we are differentiating between these two bikes is bases the brand name and the year of manufacturing. [snorts] Now let's take a look at the example of methods. I'm going to rewrite my init method. And now I am creating an function a method of top speed. And a function of type. Now I'm going to create an object of bike. Now this method this object bike can invoke methods top speed and type because they belong to the same class bikes. So initially when I created my object bikes I'm instantiating it with BMW and the year and then I am making a call to the method top speed and then I'm making a call to the method type and printing. So basically I'm printing the output of the function top speed and output of the function BMW form the object BMW which is of class bikes. Now let's take a look at an example of single level inheritance. Let's create a parent class called animal and create a method called sound. And let's create a child class cat which inherits animal. And let me just put a method over here. miss the indentation. Okay. So now I have object parent class animal child class cat which has inherited animal and the parent class method is sound and the child class method is meow. So now I'll create an object called cat and with this object I'll be able to invoke both child class method and the parent class method. And as you can see uh the child class has inherited both uh parent and child class functions methods. Now let's take a look at multi-level inheritance example. I'll start off with creating exactly the same parent class called animal. Then I am I am already created another class. I'll create same child class cat. And now I'll create another class which will inherit cat class. So cat has inherited animal and cat child has inherited cat. Let's validate its syntax. And similarly now I'll create an object for cat child. And this cat child now can invoke the same methods which are in child parent and the super parent. So this is an example of multi-level. This is an example of single level inheritance. Now let's take an example of polymorphism. We are going to create a class parrot and define the function fly and swim. Now we are going to create another class. Mind you there's no inheritance here. We are just creating an independent class called penguin. And same methods now the same name fly and swim. Okay, now let's make a function in which we will pass an object and basis that what is the instance of the particular object bird it the corresponding method will get invoked. So let's see in the method flying test whatever instance of the bird object will be the corresponding of method will be called. So now let's create a object of parrot class and then let's create a object of penguin class. Now in my flying test method first I'll send a object of instance parrot and then I'll send the object of instance penguin. So now bases the instance type when this bird.fly method will be called it will be called bas is the instance. So in the first case the parrot it will call this method and in case of penguin it will call this method fly. So please note what is the output. The output is a parrot can fly but a penguin cannot fly. And it has been decided by the Python at the runtime that which particular method to be invoked bases the instance. So it's a very important concept. Now let's take an example of encapsulation. I'll make a class cars. define its init method. Now within that init method I have created a private variable with underscore max price and given a value of 9 lakh. Now I am creating another function called sell and in that I am printing the max price and then I am creating another function in which I am modifying the private variable. set max price. So I will pass any value in the set max price and it will replace the max price which I have set during the initialization at this point. Now let's create an object of class cars and see if I sell this then the selling price is 9 lakh what I had initi at the set at the time of initialization. Now what I'm trying to do is I'm trying to modify a private variable directly c_m max price and I I want to check if I'm trying to create uh modify a private variable will it still show me 9 lakh or 10 lakh value and it's still showing me the n lakh value it means that I can't directly approach or access the private variable I can only modify it if I access it through a method which is set max price. In this now I am setting the max price to 1,000. And now if I print what is my max price? It will print as 1,000. So this is the concept of encapsulation. You have a private variable which is accessible within only the methods of the class. You can't access it directly. Now let's take a look at hierarchal inheritance. [clears throat] I'll create a class employee and create a init method within that you have three variables name age and salary so an employee with has name age and salary now I'm going to create a class child class called child employee 1 which is inherited from employee and child employee 2 which is also inherited from employee. [clears throat] So what I'm going to do is I'm going to create a object per child class and print. So this is a typical example in which you have two child classes which have inherited from the single parent aral inheritance. Now let's take a look at our last concept which is abstraction. So now I'll create a class car and define a method mileage. But I am not giving any definition to it. I'm just giving a signature mileage. The child classes which will inherit abstract class will be giving the definition. So I am giving creating a class BMW which will again which has inherited the car ABC car but given the definition now. Similarly, I am creating another class Jaguar which has inherited the class car. But now it is giving a different definition. It's printing mileage 25 km per hour and another class Range Rover and another class renol. Okay. So four classes which have implemented the abstract class method mileage in a different way. Now I'll create an object of first BMW and invoke method mileage. So it has method invoked the method mileage on BMW car and printed mileage is 30 km. Similarly, I'll do for Renault, Jaguar, and Range Rover. So if you see the parent class abstract parent class has not implemented the method but just given the signature of the method and all other classes have implemented it and that's the concept of abstraction. So what is a lambda function? A lambda function is one of the simplest ways to define a function in Python. A lambda function is an anonymous function defined without a name and does not have the def keyword. It can accept any number of arguments but can only have one expression. So the function is always defined using the lambda keyword which you can see it here. So here we have the syntax for lambda function. We use the lambda keyword followed by the arguments and then we have a colon. After that we have the expression that we want to evaluate. Cool. Now moving ahead, let's look at an example of using lambda function in Python. Now if you were to add two numbers in Python using a function, you would ideally use the def keyword followed by the function name and then pass in the arguments. You can see the arguments here a and b. Then use the return statement to get the value of the addition. So we have return a + b. And finally you will call the add function and pass the argument values to get the result. Now this operation can be done using the lambda function as shown here. So we have defined a variable called add which is equal to and then we have used the lambda function followed by the two parameters or arguments. So here a and b are the arguments and then I have my expression a plus b. See all this you can do it in one line. And then to call the function you use print followed by the variable which is add and then you have the arguments 3a 8. So the addition of 3 + 8 would be 11. Now you can see that instead of using the df keyword you have used the lambda keyword and there's no parenthesis required. Anything after the lambda keyword is treated as a parameter or argument. So we use a colon to separate parameters and the expression. In our case, the expression is a + b. Now moving ahead, we'll look at the pros and cons of lambda functions. So lambda functions are suitable for simple logical operations. So when we want one expression in return, we can use the lambda function. Now lambda function is used as a parameter to different functions such as map, filter, reduce. We will see all this in our demo session. Now coming to the cons of using a lambda function. So lambda functions can only evaluate one expression. As I told you earlier, you cannot write a dock string to explain all the inputs, operations and outputs as you would do in a normal userdefined function that uses the DF keyword. And finally, lambda functions are generally not preferred when you have to declare a function with multiple lines of code. Now, let's head over to our Jupyter notebook where we will learn about lambda functions and how to use it in different ways. So, I'm on my Jupyter notebook. Let me just go ahead and we'll rename the notebook as Lambda functions in Python. Okay, I'll just click on rename. Cool. First of all, I'll write a general userdefined function using the def keyword. Let's say I want to add two numbers. So this example we have already seen in our slide. So the way to do is I'll use the df keyword followed by the function name and then I'm giving my arguments or the parameters. After that, let's say I want to store the addition of a plus b in a variable called result. So I'll say result equal to a + b. And then I want to return my output that is result. So I'll say return result. So this is how you'll normally create a function in python. If I run it and then I'm going to call my function using the function name that is add and then I'll pass in my parameters A and B. Let's say my A is three and B is four. If I run this, I will get the result seven, which is fair enough. Now, if I want to do the same operation using a lambda function, I would do something like this. Let's say I'll create a variable called add and then I'm going to use the lambda function followed by the arguments a comma p. Then I'll give a colon and say a + b. After that I'll just say add and then pass in my parameters 3a 4. If I run it you have the same result that is seven. Now let's see another example using lambda functions to add a number. This time I'm going to pass in only one argument. So I'll say add equal to lambda. My argument is x. I'll say x colon x plus let's say I want to add x with 100. I'll say print add. Let's say I want to add 50 with 100. If I run it, I have the result 150. All right. Now, in Python, there is no need to assign a lambda to a variable. You can directly call it. Let me show you how to do it. I'll say lambda a, b, which are my arguments. again this time I'm going to use a multiplication operator since I want to do a product of a and b and after that using another parenthesis you can directly pass in the arguments so there is no need to explicitly assign a lambda to a variable so if I want to find the product of let's say 15a 30 if I run it I have the result 4 T. Let's change the arguments. Let's say I want to find the product of 5, 7. The answer is 35. So this is known as an immediately invoked function expression or I if which is often pronounced as ify. Now you can also use keyword arguments using lambda functions. Let me show you what I mean. I'll create my lambda function and assign it to a variable called product. I'll say lambda. Let's say my arguments are x, y, and z. After that, I'll give a colon and say x multiplied by y multiplied by z. Next, I'll say print my variable that is product. And here I'm going to use keyword arguments. So I'll say let's say Z = 5, X= 10 and Y = 4. You can see here this need not be in an order as you have defined the arguments. If I run this, I have the result the product of 5 * 10 multiplied by 4 is 200. Now you can also use default arguments. Suppose I say add equal to I'll use the lambda function and say x comma y I am assigning a default value of let's say 15 and z let's say I'll assign a default value of 24. Then I'll give my colon followed by the expression that is x + y + z. Now I'll say print add. Now here I'm going to only pass in my value for X since I have already given a default value for argument Y and Z. So my function only needs one argument that is X. So let's say I want X to be 20. If I run this, you see the result here. So 20 + 15 + 24 is 59. Now you can also use the asterisk ars parameter or args. So this allows you to define as many arguments as you want. So I'll say addition equal to lambda. Then I'll say asterisk er. So this will allow us to pass in as many arguments as you want. And I want to find the sum of arcs. So I'm using the inbuilt sum function in Python. Now I'll say print my variable name that is addition. And let's say I want to find the sum for four values or four arguments. Let's say 20 2 and let's say 50. If I run it, so the value is 112. So 20 + 2 + 40 + 50 is 112. Cool. Now, lambda functions are also used with higher order functions which take one or more functions as arguments or return one or more functions. Let me show you. So, I'll define a variable called hired which stands for function and ORD stands for order. So, I'll declare my lambda function. Suppose the parameters are x and then I have a function and then followed by a colon I have expression as x plus function of x. Now I'll say hire f and I'll pass in my two arguments. Let's say my x is 20 and for this function I'll have a lambda function defined. I'll say lambda x colon x * x. Now let me just run this and I'll show you the result. Okay. So what it did was it added my value of x that is 20 with function of x or fu of x. What is fu of x? fu of x is x * x. So 20 * 20 is 400. So this becomes 400 plus x which is 400 + 20. Hence the result is 420. So this is known as a higher order function. Now let me show you another example. Let's say I want to display order event by taking the value of x. I'll say lambda x colon here I'm going to pass in my expression if x mod 2 give a space here. I'll say and, odd, or even. Now I'll give my argument value. Let's say 30. The result is even because 30 is divisible by 2. I'll just change this to let's say 15. If I run it, the answer is odd because 15 is not divisible by two. Let's say I have 150. The answer is even. Now moving ahead. So let's write a lambda function that checks if a string is a substring of the given string. So I'll create a variable called subcore string. Now I'll assign this variable with a lambda function. I'll say lambda my argument let's say string I'll give the colon and pass in my expression string in let's say my string has this message welcome to python functions tutorial. Okay. So we are going to check if a string let's say in to welcome python java anything whether it's present inside this string which is welcome to python functions tutorial. Now let me go to the next line. I'm going to print sub string and let's say I want to check for my string let's say java. If I run it, it gives me false because the word Java is not present inside my string. Welcome to Python functions tutorial. Suppose I write Python. Now one thing to note here is the P is small and here the P is in capital letter. If I run it, it again gives me false because Python is case sensitive. Now if I make this as capital P, it will result in true. Let's say I want to see instead of tutorial let's say I have training. If I run it, it tells me false because this word training is not there in the string. Welcome to Python functions tutorial. I'll change this to tutorial. You see here I have my result as true. All right. Now let's see how to use lambda functions using filter function. So we are going to filter a list of numbers using a specific condition. So I'll create a list called num. Let's say it has values 40 10 40 then we have 56 27 let's say 33 15 and 70. So this is my list. Now I'm going to use my lambda function along with the filter function. So I'll pass in my variable as greater. I'll say list. Then I'm going to pass in the filter function and inside the filter function I'll use the lambda function and I'll have my argument as num and my expression let's say I want to filter only those values which are greater than 30. So I'll say num greater than 30. This is my expression or the condition that we want to check. I'll give a comma and I'll have my next argument as num. And let's go ahead and print the variable greater. If I run this, there you go. You can see here we have all the values from the list or the numbers from the list that are greater than 30. So we have 40, 56, 33 and 70. So 10, 27 and 15 are less than 30 and hence those three values were not printed. Now let's say you want to filter a list of numbers that are divisible by four. So I'll create another list called list one. And let's say I'll have the same values in the list. So I'll just copy it and I'll paste it here. And I'll create my variable. Let's say divide. I'll say divide equal to list one. I'll use the filter function followed by the lambda function. I'll say x colon. Then I'll have my expression x mod 4 should be equal to equal to zero. I'll give a comma and pass in my next argument as my list one. Now I'm going to say print divide. Okay. Okay. I'll remove the bracket here. There's no need of a bracket here. Cool. And we'll delete here as well. Now let's run it. Okay. There is one error here. This should be list one. Let's run it again. Okay, there is some error. Let's debug it. Okay, so this should be the function list. Cool. There you go. So here you can see we have two numbers 40 and 56 that are divisible by four. The remaining numbers are not divisible by four and hence were not printed. All right, now let's go ahead and explore how you can use the map function along with the lambda function. So the map function accepts two arguments, a function and a list. It takes that function and applies it to every element of the list and returns the modified list. So we'll create a list called list two. I'll say equal to and again we are going to have the same values in the list as above. So I'll just copy those values or the numbers and I'll paste it here. Okay. Now let's say I want to find the value of a number multiplied by two. So I'll say let's say the variable name is double the num or double the number. I'm going to use the list function followed by the map function this time. And then we'll have our lambda function. I'll pass in my argument as x colon followed by the expression. So x multiplied by 2. I'll give a comma and then we'll have the list that is list two. There's a spelling mistake here. This should be list two. All right. Now I'm going to say print double_the num. Make sure there is no space in the variable name. Now if I run it, you can see here we have multiplied every number in the list by two. So 10 * 2 is 20. 40 * 2 is 80. Similarly 30 * 2 is 66. 15 * 2 is 30. And again we have 70 * 2 is 140. So this is how you can use map function with lambda functions. Now suppose you want to find the power of a number. Let's say I want to find the power of a number raised to 3. So I'll create a list called list 3. Let's say I have values 2 5a 10a 6a 4 and then let's say we have 12. I'll say cube. So I want to find the value of a number raised to the power three. So for that I'm going to use the map function followed by the lambda function. I'll pass in my argument x and then here I'm going to use the inbuilt power function in Python. So p my argument x and this x I want to raise it to the power of three. And then I'll have my next argument which is list_3 or list three. Okay. Now let's print the list. So I'll say list of cube. I'll run it. You can see here. So 2 raised ^ 3 or 2 cube is 8. 5 cube is 125. 10 cube is 1,000, 6 cube is 216, 4 cube is 64 and 12 cube is 1728. Now coming to the final section of the demo where we'll see how to use the reduce function in Python along with the lambda function and then we'll use a lambda function within a userdefined function. So first let's look at how to use reduce in Python. So reduce applies a ruling calculation to all items in a list. You can use it to calculate the total sum or to multiply all the numbers together. So reduce function is a part of funk tools module. So to use the reduce function, you need to import the funk tools module first. So I'll say from funk tools import my function that is reduce and then I'll say let's say I have my list four this time I'll create a list I'm going to take the same values as above and I'll pass in within a list and now I want to find the sum sum of all the numbers that are present inside this list called list four. So I'll do that using my reduce function followed by the lambda function. So I'll say x comma and I'll give my expression as y colon x + y. Give a comma and pass in my last argument which is my list itself which is list 4. All right. And then I'll say print sum. Let's run it. There you go. So 2 + 5 + 10 + 6 + 4 + 12 is 39. So this is how you can use the reduce function in Python. Suppose you wanted to find the product of all the numbers present inside the list. So you can just use the asterisk instead of the addition operator. Now if I run this, you have the product of all the numbers that were present inside the list that is list four. we have 28,800. Now let me show you the final demo that is using a lambda function in a userdefined function. So first of all I'll create a userdefined function to calculate the value of a quadratic equation. So for some of you who don't know the formula of quadratic equation, it is a x² + b x + c. So we are going to use that formula in our function and find the value using lambda function. So I'll create a userdefined function called quadratic and it will have three arguments a comma b comma c. I'll say return and here in the return expression I'm going to pass in my lambda function. I'll say lambda x which is my argument. I'll say x colon and then I'll have my equation which is a x². So I'm saying a ult*lied by x raised to the power 2. So I'm using double asterisk plus b ult*lied by x. So this becomes a x² + bx plus I have my constant that is c. Now just go to the next line. I'm going to create a variable let's say f. I'll have my userdefined function name quadratic. I'll pass in the values for a, b and c. Let's say a is 2, b is 3 and c is let's say five. and I'll call a of 1. The value of x is 1. The value of a is 2. The value of b is 3. And the value of c is 5. Now let's run it and see the result. So a x² + bx + c for a= 2, b= 3 and c= 5. The result is 10. Now let's change it to let's say I want the value of x as 2. If I run it, you have the equation evaluated and the result is 19. All right. Now a python module is nothing but a simple python file with py extension including the statements and the definitions. So basically you need to prepare a module file with all the functions which you want to import into your regular Python code across all the modules. Now it contains codes that you can reuse in several programs. So it's like saying you write once a piece of code like common utility methods, calculation methods, rounding off, addition, subtractions or some common business rules which can be reused across your uh project then you keep it at one place. Now this helps in such a scenario where you have a large team different set of developers are working on different different modules different specifications but one single utility module file py file will contains all the common and reusable functions which not each and every individual developer can will go and change. It's only few set of administrators or the senior developers can maintain and pass it on to the team. Now for example a file containing Python code demo.py is will be called as a module and its module name would be demo. So you need to take care that whatever the name of the file is that is what will get imported in your Python code. So we will see that with our certain examples on our Jupyter notebook. Now why do we need to use as I have reiterated it provides flexibility to organize the code in a logical way and it enables reusability which is the most important factor. So one of course you can organize the code you keep the reusable code at one place or you can keep a modular approach and also reusable. So no not all the developers have to go and rewrite that code and it it is uh easy to maintain and helps in debugging the code easily. So if you know that there is an error coming there is an issue coming uh in one of the modules which is imported or which is lying in the common file then it becomes easy to debug you just have to go and check that particular function you don't need to go and check in each and every piece of code. Now there are two types of Python modules. Definitely there are built-in modules which Python library provides which you don't need to import explicitly but there are certain userdefined modules which you create on yourself for your own custom development for your own custom programming. So built-in modules are predefined modules and are part of this Python standard library for example random datetime SIS. So we will take a look at these examples also and of course the user definfined modules which is the primary objective of this session where we going to show you how do you create your own defined modules and then import them. So the user creates the userdefined modules to ease complex tasks in a project. So you program the complex piece of the code in a common module and give it to everyone. You can define your own functions and classes. Now what are the different ways? There are five different ways you can import modules. So you can just say import module name and all the uh classes and functions within that module will get imported. You can give an alias. So b basically giving an alias makes it simple and you can refer that alias throughout your code. Then if you want to import anything specific from the entire module, you don't want to import all the functions and classes, then you can just import the specific uh functions and classes and give their name. Then fourth is from module you want to import any address as an alias. You can import and give an alias to the specific uh function name or the class name. And then of course similar to the first syntax you can module all everything. So first and the last syntax are almost having the same meaning to module to import everything in your module. Okay. So with this background u uh let's first take a look at the python file. So we have what we have done is we have created a module calculations py. So just please focus on the part where the name of the file is calculations and in this python file py file we have created couple of functions uh and the relevant logic related to those functions. So very simple functions like addition add you pass two variables and you send the result uh add the variables and send it back. Basically we are overriding uh the Python internal operator add in our Python module and we will be invoking this one. So we'll show you how to invoke. Then you will have I have written multiplication division remainder. So you two you pass two variables divide them uh and find the remainder. Then now a custom function where I'm adding 10 to both the variables which are being passed to this function and returning the result. Then there is a function which checks whether the number is a prime and if it is not a prime number you will get this output and if it is you will get a is a prime number. Okay. And then another function which says check anagram. So we will just sort the two strings which we will send and check both are equal or not. If both are equal then the strings are anagrams otherwise they are not. So these are the set of functions which we have written. Now we will see how will we use them in our code. Now first syntax which I am writing is import calculations. So this is the name of my py file which is residing in the same folder where I am writing this piece of code. And now if you see in my py I have a variable y whose value is six. So I'm just using that value and running it and printing it. I'm just going to uh show you how explicitly I'm invoking the functions in the calculations class in the calculations py file. Okay. Now let's invoke another function remainder passing 140 and then I should get 20 as an output. Okay. So this has gone back and executed this particular function. Now what I'm going to do is another example of my addition. I'm saying calculations do add. I'm going to initialize and pass two variables and my expected output is 35. Okay. So it has gone and executed this function. Now I'm going to show you another syntax of importing. So from calculations I'm just importing the add function. So I'll ask for user input to enter first one and two numbers and then I'm just going to add it two and five. So I got my output as seven. Now the difference to be noted over here is that in the previous uh syntax I was making a call like calculations do add but now I don't need to make a calculations do add syntax uh invocation I just need to say import add and I just need to use the add function that's all. Now let's use another syntax to import modules. So I'm using import calculations as cal. So all the modules are imported but the alias uses scal. And similarly like the previous example I'm going to take two inputs and print the sum. Now the difference in this syntax and this syntax is I'm using the alias cal dot add but my output should be same. Okay. Similarly I can call prime whether it's not a prime or prime number. I can call the check anagram using the same alias and I can call the remainder function. Okay. So I hope you have noticed that the difference in importing the way of importing the module makes a lot of difference. Right now let's take another example of importing some functions or variables. So I'm going to explicitly I'm importing my variable y and functions multi-p prime and check anagram explicitly and I'm going to print y okay and I'm going to multiply two numbers so if you see I'm using these aliases over here okay I'm using these variables directly as I've already imported Okay. Now I'm going to say prime 9. Now it's printing none. If you see it's because of the statements which are not executed, right? So that's why you are seeing. Now let's check anagram. And now another thing to be noted is I'm trying to invoke a function remainder which I have not imported over here. So let's see how what error Python throws. Okay. So yeah. So Python has throws an error that name remainder is not defined because I have not imported it over here. So now in order to import remainder what I'm now doing different is importing all the functions. Now if I use remainder it should run. Okay I am using divide. Okay cool. Now I'm going to show you another function which is a utility function directory function which will show me all the functions variables as part of the Python file add add 10 check anagram divide multi prime remainder y and of course these are some inbuilt packages uh which are already there in the Python file as part of the Python uh loader but these are the ones which I have created. So you can actually see the list of all those uh functions in one go. Okay. Now I'm going to show you an example of inbuilt modules. So this import math math is an inbuilt module of Python. And I'm going to show you how you can see all the relevant functions within the math module. All these are the math module functions which are available for you to use. I'm going to show you one or two. So like print math 2 to the power 8 and you get the answer 256 print math remainder. So I'm not invoking my uh module function. I'm invoking the math inbuilt library function remainder and the remainder is 0. 40 divided by 2 remainder is zero and square root of 81 9. Then very important another very interesting utilities of date time which you can use and you can print today's date and time. Then another utility is random utility and I'm going to create a list L1 and write a piece of code which will choose a random element from this list and just print it. Okay. So if first time it has chosen OPPO again if I run it it will choose one plus. If I again run it, it might choose something else. So it will randomly pick. Okay. Okay. So with this we have seen that you can create your own utility functions. Import it uh write it in a piece of code py file import it in your code as an alias or all the modules and use them or you can use the python inbuilt uh modules. Right. Today we are going to discuss how exception handling is done in Python. This concept is not new in any programming language. It is pretty prevalent in Java and other programming languages and it's it's on the same lines how we can do exception handling in Python. So let's take a look what are the nuances and what are the syntaxes for exception handling in Python. So what are we going to discuss today? We going to start with discussion of need of exception handling. What is exception handling? the types of errors you can handle in exception handling and how exception handling works and in the end certain points to be remembered and also we will support our slides with a Python Jupyter notebook examples. Now what is the need for exception handling? any programming language or any program you write there is definitely a need in order to have a clean execution of the program even if the program throws errors. So you need exception handling for cleanly logging the exceptions or throwing meaningful errors to the users. So when does exception occurs right whenever the program gets terminated right the program terminates whenever an error occurs right so it could happen that an error could be a fatal error and the program gets terminated in between or there could be a certain termination which can corrupt the program right so you need to handle exceptions or there may be there might be a data loss because of those exceptions and you need to take care that that that doesn't occur or the data loss does not happen or even if data loss happens then you pass on a meaningful message or you capture a meaningful message in the logs at the right point. Now what is exception handling? An exception is a runtime error that terminates the execution of a program. So basically whenever an exception occurs the program gets terminated. you are thrown out of the running program. Exception handling means you generate a message in correspondence to the occurrence of the error and take the right step to handle it. So now an exception has occurred but you need to handle it. Now by handing we mean that you need to throw a meaningful message as I said earlier and then you might need to navigate the program into the right direction or take some certain corrective actions uh in order to handle the error. So all that comes under the exception handling criteria. Now in general there are three types of errors. compile time errors, logical errors and runtime errors. Now compile time errors are the errors which any programming compiler or Python compiler will show you while you are compiling your program. So it could be because of the syntax spacing uh indentation or you would you are using wrong keywords all those will get captured at the compile time. logical errors. You know, you have not used the correct syntax around logical operators like and or or or your if else conditions are incorrect and you are expecting an output uh but it is not coming as per your expectations. So those are logical errors and the most difficult ones to capture and track and handle are the runtime errors. So imagine your program is compiled and as per your expectation uh you are expecting an output you have uh you know written a logic but at the runtime it does not gets executed it does not run as per your expectation and the program gets terminated unexpectedly. So the the runtime errors are the most critical and important in order to handle them. And if you talk about uh runtime errors handling in production scenarios then it becomes very critical that you have handled the exceptions correctly and captured the logs correctly so that the support team can point out uh where the error has exactly happened. Now how exception handling works there are certain syntaxes uh in Python which you need to follow. Now you generally put the u uh exception handling code the code for which you you want to handle the exception under a try block. So you run that piece of code under a try block and then you put an accept keyword where you basically throw an error message and then if there is no exception right then also you can handle the code. Okay, if there is no exception in my code, then how the code will behave? Yeah, right. So, it could be possible that there is a runtime error. But if there is no, then you might want to do some logical uh calculations or you want to put something over there. You can put in the else block. And then finally, now finally is a code block which will always get executed irrespective of you had an exception in your code or not. So basically generally uh if you go by the legacy programming uh if you have opened a database connection uh or if you have opened a file and you it is essential to close those connections uh from your program then those closed connection code are written generally in the finally block irrespective of the except exception coming you need to close those connections otherwise you will run out of your connection pools. Now it's a pretty straightforward uh flowchart of an exception and handling. You start with a try block and then if an exception occurs in your code then it will go to the accept block otherwise it will go in the else section and then finally you have the finally block where the code will finally get executed and stop. So as I said you put that piece of code in the finally block which is mandatory and generally the block uh the code which is essential to release the resources which the program has consumed uh the CPU resources the memory resources hardware resources which the program is using you have to release that in the finally block except block you have to use for capturing the error uh and throw a meaningful message or do any other logical operation and else block if you want to continue your program as is. Now what are the points to remember? These are very important uh points which you should consider. You can write a try block without any except block. So it's not essential that you put a except block always or you can write several except blocks for a single try. You might be expecting a null pointer exception or a divide by zero exception or a incorrect variable naming exception. So you can start off with one try but you can have different except blocks to capture these different kind of exceptions and throw a relevant meaningful error per accept block. Also you can write multiple except blocks to handle multiple exceptions. It's almost the same thing. And you can write exception as an object. You can also uh print or capture an exception as an object or you can write multiple exceptions within a tpple. You can capture the multiple exceptions, add it to a tpple and throw it away. Okay. So now let's take a look at uh certain examples which we want to run in order for better understanding of exception handling. Now throughout my exercise I am going to focus on divide by zero error which we are able easily able to simulate. So I'm going to mostly show you how we can capture a divide by zero error. Okay. So I have declared a variable a and I have declared a variable b uh a as 10 b as zero. Now I'm trying to divide a by b. Now I'm trying to divide a number with zero. So ideally yes, this is not a correct mathematical operation. Divide by number zero uh is not allowed. So I should get a zero division error. Now this is an unhandled exception. My program has not handled it properly. So that's why you're get getting this error on the uh trace of the Python trace. But if I handle it properly then I can very cleanly throw this error and capture this error. Okay. So I am going to take input in B. enter a and b and I'm just going to print a generic except block. So 10 zero and I have got an exception and I have printed it. Now there is no stack trace there is no trace but at least I'm able to cleanly throw an error a meaningful error. Now again I'm differently going to handle the exception. I'm going to uh create the same exception but going to handle it differently. Now there's a try block. Now I am writing an except block to capture the specific exception zero division error exception. In the earlier code block I had just written except so any exception would have come to this block. But in this except block only zero division error will be captured. So as you can see uh I cleanly uh handled the exception. Of course I gave the names except zero division error and then my code got executed later on. Now in another example what I'm going to do is I'm going to show you that if my code runs cleanly then it's not necessary my except block will get executed definitely because if there is no error then the except block will remain redundant Now here you see what I have done is I have taken genuine two numbers divided them printed a new line and then completed. So as there was no exception the exception block did not got executed. So the point to be highlighted over here is that it is not essential that you know exception block will get executed always. It will only come into picture when there is a relevant exception getting exe getting generated. Now let's take an example of how we can print an exception object. So I'm going to take my previous code and here I am capturing the exception but also printing the exception object. So what has happened is I have printed the exception of a message a custom message plus I have printed the exception object. Okay. Now I'm going to take the same example but I'm not going to generate an exception. So my exception block did not got executed and I was able to simply print simply learn. Now let's take another example where I am capturing my exception in in a variable. So do not divide number by zero. And in this ex I I have captured my exception division by zero. So in the exception the python generated exception name is this and I have printed over here. So division by zero is the python generated exception which I have appended in my print command. Now I'm going to take another example where I'm saying is that I will print exception as a plus I'm going to also capture another exception. So it's like one try and two exceptions. So one exception is do not divide number by zero and second exception is name zed is not defined. Right? So I'm so as I said earlier you can have one try but two except blocks which is permissible. Now one thing is that you know you this exception print a byz came went through both the except blocks except this exception and this exception though this exception is not divide by zero error. So therefore therefore in this A variable nothing came in but in the B variable the name error was definitely captured because it's a name undefined name Z is not defined error and that's why you can see that do not divide number by zero after that we do not have any relevant meaningful message. Okay. Now let's take another example where we are going to have two except blocks and out of these two only one will get executed. Okay. So there's no type error exception. So that except block did not got executed but only zero division error is there. So only that got printed. Now you can explicitly also raise an exception. It's not like you just have to wait for a runtime exception. You can also raise your ex raise an exception from your code and execute it. So if you see this what we have done is just created a variable with a negative value and just checking that if the value is less than zero then raise an exception. So that's what we have done. Similarly you can also throw raise an assertion error. It's it is called assert and you can run this uh message. You can throw this message compatible with Linux only. So first we'll see what are Python libraries. And before we delve into the details, let's understand about it. In Python, libraries are sets of pre-written code that provide various functionalities, making it easier for us to perform task without having to reinvent the wheel. They are like toolboxes filled with functions and modules designed to handle specific task such as data manipulation, visualization, web scraping, and much more. And now we'll see some of the essential built-in libraries that is Python comes with a rich collection of built-in libraries that provide fundamental functionalities. Here are some essential ones you need to know. The first is math library. This library is essential for mathematical operations including complex arithmetic trigonometry and more. Then datetime library. It allows you to work with dates, times and time intervals making it handy for various applications. Then we have string library. This library offers a wide range of string manipulation functions making working with text a breeze. Then we have random library. Need random number generation or shuffling? The random library has go to cover. Then we have data manipulation libraries. Data manipulation is a crucial part of any Python project especially in data analysis and machine learning. Here are some powerful libraries for data manipulation. The first is numpy short for numerical Python. This library provides support for large multi-dimensional arrays and matrices along with highlevel mathematical functions to operate on these arrays efficiently. Then we have pandas. Pandas is the go library for data manipulation and analysis. It offers data structures like data frames and series making data handling and cleaning a breeze. Then we have data visualization libraries. Presenting data visually is key to understanding patterns and insights. Here are two popular data visualization libraries. The first is Matt plot lip. This library provides a flexible and comprehensive set of plotting tools for creating static interactive and animated visualizations in Python. Then we have seabone built on top of metro lib. Seabone offers a highlevel interface for creating stunning statistical graphics. Then we have web scraping libraries. Web scraping is a technique used to extract data from websites. These libraries help you gather data from the web effectively. The first is request. This library allows you to send HTTP request effortlessly making it easy to fetch web pages. Then we have beautiful soup. Beautiful soup helps pass HTML and XML documents extracting valuable data from web pages. Then we have machine learning libraries. Machine learning is an exciting field and Python has some fantastic libraries for it. The first is scikitlearn. This is a powerful library that provides simple and efficient tools for data mining and data analysis. It's great for implementing machine learning algorithms. Then we have TensorFlow and KAS. If deep learning is your thing, TensorFlow and KAS are your go-to libraries. They're widely used for building and training neural networks. And after this, we have GUI development libraries. Creating graphical user interfaces is made easier with these libraries. The first is Kter. Kintter is Python standard GUI library simple to use and allows you to create basic windows, dialogues, and buttons. Then we have PIQT and Pyite. These libraries offer more advanced UI capabilities and are perfect for building complex desktop applications. And before we start with all the Python library, now over to our training experts. Python is the most widely used programming language today. When it comes to solving data science tasks and challenges, Python never ceases to surprise its users. Most data scientists are already leveraging the power of Python programming every day. It's an easy to learn, easy to debug, widely used, object-oriented, open-source, high performance language. And there are many more benefits of Python programming. Python has been built with extraordinary libraries for data science that are used by programmers every day in solving problems. Master Python and other core data science topics to help you kickstart your data journey with our professional certificate program delivered in partnership with Purdue University and IBM. This data science certification features master classes by Perio faculty and IBM experts, exclusive hackathons and AMS sessions by IBM experts. This course covers tools and techniques like numpy, pandas, python and sci along with industry projects like Uber transport service provider, Amazon e-commerce and retail in Walmart. Choosing this course can get you high in renowned companies like Netflix, Amazon, Facebook, Adobe and average salary hike of 70%. So what are you waiting for? Join the data science professional certificate program and excel your career in data science. The link is in the description box below. >> If getting your learning started is half [music] the battle, what if you could do that for free? Visit Skill Up by Simply Learn. Click on the link in the description to know more. Now before talking about top Python libraries, let's take a look at what a library is. Python has produced a number of open source libraries, each with its own root source. A library is a previously combined set of code scripts that may be utilized iteratively to save time. Now in contrast to languages such as C++ or C, Python libraries are not context specific. Now a library in this context refers to a collection of essential components. A library is a collection of modules that can be installed with the help of a package manager such as pip. Now that we know what libraries are, let's take a closer look at some of the most popular libraries in Python. First on the list, we have Numpy. Numpy is an open-source Python library used for scientific computing and data analysis. It provides powerful numerical and mathematical functions that enable efficient computation of large multi-dimensional arrays and matrices. Numpy is an essential library for data manipulation and analysis in fields such as machine learning, image processing, and scientific computing. Now, some of the key features of NumPy include multi-dimensional arrays. Numpy provides a powerful n-dimensional array object that can be used to store and manipulate large data sets. Mathematical functions. Numpy provides a wide range of mathematical functions that can be applied to arrays and matrices as well including linear algebra for transforms and random number generation. Numpy is widely used library in the data science and machine learning communities and is often used in conjunction with other libraries like pandas, scikitlearn and tensorflow. Second on the list we have pandas. Pandas is an open source data manipulation and analysis library for the python programming language. It provides easytouse data structures and data analysis tools for handling and manipulating structured data. PANAS provides two main data structures. One is series and other one is data frame. Now a series is a one-dimensional labeled array that can hold any data type while a data frame is a two-dimensional label data structure with columns and potentially of different data types. Some of the key features of pandas include data cleaning. Pandas provide tools for cleaning, filtering, and transforming data such as filling missing values, removing duplicates, and replacing values. Data manipulation. Pandas provide powerful tools for manipulating data such as grouping, merging, and reshaping data. Integration with other libraries. Pandas integrate with other popular libraries such as NumPy, Scypi, and Scikitlearn to provide a complete data analysis and machine learning environment. Pandas is widely used in data science and analysis and are particularly useful for working with tabular data such as data in CSV and Excel files. Next on the list we have Mattplot lib. Mattplot lib is a Python library used for data visualization. It provides a wide range of tools for creating graphs, plots, charts and other visual representation of data. It is a highly customizable library that allows you to control every aspect of visualization you create. You can customize the style, color, size, appearance of elements such as lines, markers, axis, titles, and legends. It also offers several types of plots including line plots, scatter plots, bar plots, histogram plots, pie chart, and many more. Mattplot Lib is built on top of numpy, which makes it easy to work with arrays and other numerical data. Mattlib also integrates well with other Python libraries such as pandas for data manipulation. Scypi for scientific computing and Cabbond for statistical data visualization. Fourth on the list we have scikitlearn. Scikitlearn also known as sklearn is a popular opensource machine learning library for Python. It provides a wide range of algorithms and tools for building and evaluating machine learning models. Scikitlearn is built on top of numpy, scypi and mattplot lab which makes it easy to integrate with other scientific computing libraries in python. It provides a comprehensive set of tools for various machine learning tasks such as classification, regression, clustering, dimensionality reduction, model selection and pre-processing. It also includes popular algorithms such as decision trees, random forest, support vector machines, logistic regression, K nearest neighbors and many more. Scikitlearn provides a consistent API for all algorithms making it easy to switch between different models and algorithms. Scikitlearn also provides a wide range of pre-processing tools for cleaning and transforming data such as scaling, normalization, and feature extraction. Fifth on the list we have scrappy. The next known Python libraries for data science is Scrappy. Scrappy is one of the most popular fast opensource webcrolling framework written in Python. It is commonly used to extract data from web pages with the help of selectors based on XPath. And talking about its application, Scrappy helps in building crawling programs that can retrieve structured data from the web. Scrappy is also used to gather data from APIs and follow a don't repeat yourself principle in the design of its interface influencing users to write universal codes that can be reused for building and scaling large crawlers. Sixth on the list we have KAS. Similar to TensorFlow, Keras is another popular library that is used extensively for deep learning and neural network modules. KAS supports both TensorFlow and Theo backends. So it is a good option if you don't want to dive into the details of TensorFlow. Talking about its features, Keras provides vast pre-labelled data sets which can be used to directly import and load. It contains various implemented layers and parameters that can be used for construction, configuration, training, and evaluation of neural networks. Next in the list of top Python libraries for data science is PyTorch, which is a Python based scientific computing package that uses the power of graphics processing units. PyTorch is one of the most commonly used preferred deep learning research platforms built to provide maximum flexibility and speed. Talking about its application, PyTorch is famous for providing two of the most highle features. First one is tensor computations with strong GPU acceleration support and building deep neural networks on a tape based autograd system. Eighth on the list, we have beautiful soup. Beautiful soup is the next Python library for data science. This is another popular Python library most commonly known for web crawling and data scraping. Users can collect data that's available on some website without a proper CSV or API and beautiful soup can also help them scrape it and arrange it into required format. Now beautiful soup is widely used in web scraping applications and is considered as one of the most popular and powerful web scraping tool available in Python ecosystem. Next on the list we have Pygame. Pygame is a set of Python modules designed for writing video games. It provides functionality for working with graphics, sound, and user input as well as tools for handling events and timing. Now, Python game is built on top of the SDL library which provides a low-level interface for accessing hardware and input devices. Some of the features provided by Pygame include support for 2D graphics, rendering including image loading and manipulation, sprite handling and drawing primitives, support for playing sounds and music, including playback control and volume adjustment. Support for handling user input including keyboard, mouse and joystick events. Pygame is often used for prototyping and developing small to medium-sized games as well as for educational purposes. Its ease of use and flexibility makes it a popular choice for game development beginners and hobbyists. And finally on the list we have Theiano. Theo is a Python library for numerical computation designed for deep learning and machine learning applications. It allows users to define, optimize and god mathematical expressions which includes multi-dimensional arrays, the fundamental building blocks of many machine learning algorithms. Now talking about features, Theaniano is designed to efficiently perform numerical computations on both CPU and GPU which can significantly speed up the training and testing of machine learning models. Theo provides automatic differentiation functionality making it easy to compute gradients and optimize parameters while training machine learning models. And some of its applications are scientific computing, simulation, optimization, and deep learning. In addition to these top 10 Python libraries for 2023, there are many other helpful Python libraries, ones that deserve to be looked at. If you're interested in learning and mastering data science with Python, head on to SimplyLearn's professional certificate program in data science. Do explore the frequently asked data science interview questions and unlock your career as a data scientist. Python GI frameworks. The first question that should arise in your mind should be why to use Python GI frameworks. Python GUI frameworks are used to create graphical user interface for applications. GUIs make it easy for users to interact with an application and they are critical component of modern software. There are several reasons to use Python UI frameworks for building JI applications. The first reason is crossplatform support. Python UI frameworks are often crossplatform which means that they can run on multiple operating systems including Windows, Mac OS and Linux. This makes it easy to build applications that can be used by wider audience without having to create separate versions for different platforms. Second is rapid development. Python UI frameworks can speed up the development process of building applications. Many frameworks comes with pre-built widgets such as buttons and text boxes that can be easily customized and incorporated into an application. This can reduce development time and allow developers to focus on the functionality of the application. Third, easy to learn. Python is a popular programming language that is known for its simplicity and ease of use. Many Python UI frameworks are also easy to learn and have extensive documentation and tutorials. This makes it easy for beginners to get started with building GI applications. And the fourth is large community. Python has a large and active community of developers who create and maintain GI frameworks. This means that there are many resources available such as forums and libraries that can help developers solve problems and add new features to their applications. And the next feature is integration with Python libraries. Python GIF frameworks can integrate with other Python libraries which makes it easy to add functionality to an application. For example, a developer can use a GI framework to create a user interface for a data analysis application and integrate it with a data analysis library like NumPy or Pandas. In summary, Python GIF frameworks provide crossplatform support, speed of development time, and easy to learn and have a large community and can integrate with other Python libraries. These benefits make Python frameworks an excellent choice for building modern applications. Now, we will explore some of the popular GIF frameworks. There are numerous UF frameworks available for Python, each with its own advantages and disadvantages. We will start with Kter. Kintter is a Python library for creating graphical user interfaces that is included in the standard library. It provides a set of tools and widgets for building applications with a graphical user interface and is based on the TKGI toolkit which was originally developed for the TCL programming language. KE provides a wide range of UI components including buttons, labels, text boxes, menus, list boxes, checkboxes, radio buttons, and more. These components can be used to build complex user interfaces with multiple windows, dialogues, and panels. One of the key features of Kter is event-driven programming model. When a user interacts with the KE application, events are generated by the user's actions, such as clicking a button or selecting an item from a list. These events are then handled by the application code, which can update the user interface or perform other tasks in response. Kter also provides support for creating custom widgets and dialogues as well as for drawing graphics and animations using the canvas widget. Additionally, Kter can be extended with third party libraries and modules such as Matt plot lip for plotting data and pillow for image processing. And if we talk about the advantages, the first advantage is it is easy to learn and use. The second is crossplatform and the third is it has large community and has many resources available. And now we'll talk about some of the disadvantages. So the first disadvantage is default look and feed is not modern. The second is limited set of widgets. And the third is does not support threading. Now we have our second U GI framework that is PIQT. PIQT is a Python binding for the QTGI framework which is a popular and powerful crossplatform GI toolkit that provides a comprehensive set of widgets and tools for creating modern and responsive desktop and mobile applications. PIQT allows developers to use Python to create QT based applications and user interface with ease. PIQT is distributed under the GP and commercial licenses which makes it suitable for both opensource and commercial development. It provides a wide range of modules that cover everything from basic UI programming to advanced multimedia network and database functionality. Here are some of the key features of PIQT. The first feature is crossplatform support. PIQT supports multiple platforms including Windows, Mac OS, Linux and mobile platforms like Android and iOS. Second is easy to use. PIQ is easy to learn and use especially for developers familiar with Python. Its API is well documented and provides a high level of abstraction that simplifies GI development. Third is rich side of widgets. PIQT provides a wide range of widgets and tools that allows developers to create advanced and modern GUIs. Some of these widgets include buttons, labels, text boxes, tables, menus, and many more. The fourth is customizable styles. PIQT allows developers to customize the appearance and behavior of widgets using stylesheets. This makes it possible to create unique and visually appealing user interfaces, signals, and slots. PIQT uses a signals and slots mechanism to handle events and communication between widgets. This mechanism allows developers to create complex interactions between widgets with minimal code. Now we'll talk about the advantages of PIQ. The first advantage is modern and customizable look and feel and the second advantage is large set of widgets and tools. The third is well doumented with many resources available. And if we talk about the disadvantages, it has the steep learning curve and the second disadvantage is not as lightweight and fast as some other frameworks. Third is requires licensing for commercial use. And the third UI framework is Kiwi. Kiwi is an open-source Python GI framework designed for building multi-touch applications and user interfaces. It allows developers to create crossplatform applications that can run on Windows, Mac OS, and Linux. Kiwi is based on a natural user interface and uses a graphic engine to render user interface that are touch enabled. This makes it ideal for creating applications that use touch, gestures, and other forms of natural user interaction. One of the key benefits of using Kiwi is that it enables rapid development and prototyping. It has a straightforward syntax that is easy to learn and it supports a wide range of widgets and UI elements. Developers can use Kiwi to create rich interactive applications that incorporate multimedia, graphics, and animations. Kiwi also includes support for a wide range of input devices including touchscreen, mouse, and keyboard. It also includes support for multi-touch gestures such as pinch to zoom, swipe, and rotate. Kiwi is built on top of OpenGL which provides hardware acceleration for the graphics engine. This means that Kiwi applications can be highly performant and responsive even when running on low power devices. In summary, Kiwi is a powerful GI framework for building multi-touch applications and user interfaces. It is easy to learn, supports a wide range of input devices and enables rapid development and prototyping. Its use of OpenGL provides hardware acceleration and high performance making it an excellent choice for developing cross-platform applications. Now talking about the advantages of Kiwi. The first advantage is it is designed for building modern and dynamic user interfaces. The second is easy to use with a large community. The third is crossplatform and runs on Windows, Mac OS, Linux, iOS and Android. And now talking about the disadvantages. The first disadvantage is not as widely used as some other frameworks. The second disadvantage is widget set is not as extensive as some other frameworks. And the third disadvantage is some performance issues on older hardware. And our next UI framework is Pyide. Pyide is a GUI framework for Python. It is a set of Python bindings for the QT application framework and runs on all major platforms including Windows, Mac OS, Linux, and mobile platforms such as Android and iOS. Pyite allows Python developers to create sophisticated and interactive graphical user interfaces for their applications with ease. It provides a rich set of libraries, widgets, and tools that allow developers to create applications with complex and intuitive user interfaces. The framework includes a number of features such as the first feature is crossplatform support. Pyite is designed to work on all major platforms so developers can write code once and deploy it on multiple platforms. The second is high performance. Pyite applications are fast and responsive even when dealing with large data sets or complex visualizations. And the third feature is extensive widget library. Pyite provides a rich set of widgets including buttons, labels, text boxes, sliders, and many more that can be easily customized and arranged to create intuitive user interfaces. And the next is easy to use designer tools. Pyite includes a visual designer tool that allows developers to drag and drop widgets onto a form and then customize their properties, styles and behaviors. And the next feature is MVC architecture. Pyite follows the model view controller MVC architecture which helps developers separate the user interface from the application logic making it easier to manage and maintain code. And the next feature is support for internationalization. Pyite provides built-in support for internationalization, allowing developers to create applications that can be localized to different languages and regions. In summary, Pyite is a powerful and flexible UI framework for Python that provides a rich set of libraries, tools, and widgets for creating sophisticated and interactive user interfaces on multiple platforms. And talking about its advantages, the first advantage is it has similar set of widgets and tools as PIQT. The second is LGPA licensed and the third is crossplatform. Now talking about the disadvantages, the first disadvantage is smaller community than PIQD. The next is less documentation and resources and the third is some performance issues on older hardware. Now we have our next GI framework that is WXPython. WX Python is a popular opensource GI framework for Python programming language. It is a wrapper around the C++based WX widgets library that provides a native look and feel to GI applications across different platforms like Windows, Linux and Mac OS. WX Python is a crossplatform toolkit which means that you can create GI applications that can run on different operating systems. It provides a wide range of widgets that can be used to create complex UI applications and some of commonly used widgets include buttons, text boxes, check boxes, radio buttons, list boxes, and combo boxes. Additionally, it also supports creating custom widgets to suit specific needs. Now, we'll talk about some of the features of WXPython. The first is native look and feel. WXPython provides a native look and feel to UI applications across different platforms. It supports the standard look and feel of each operating system. The second feature is object-oriented. WXPython follows the object-oriented approach which makes it easier to write and maintain code. And the next feature is event-driven. WXP Python follows an event-driven programming model which means that the code is executed in response to user events such as button clicks or key presses. The next feature is customizable. WX Python allows you to create custom widgets, dialogues and frames to suit specific needs. And the next feature is extensive documentation. WX Python has extensive documentation including API references and tutorials. And the next feature is rich set of widgets. WX Python provides a rich set of widgets that can be used to create complex UI applications. Now talking about the advantages of WXPython. The first advantage is native look and feel on all platforms. The next is large set of widgets and tools. And the next one is easy to use with a large community. And now we'll talk about the disadvantages of WXPython. The first is not as lightweight as some other frameworks. The next is documentation is not as extensive as other frameworks. And the third is widget set is not as modern as other frameworks. PI GTK is a Python binding for popular GI toolkit GTK which is used to create graphical applications for desktop environments. PI GTK provides a set of Python modules that allow developers to create JI applications in Python programming language. GTK provides a set of widgets that can be used to create user interfaces such as buttons, labels, text boxes, sliders, and menus. These widgets can be combined to create more complex interfaces. PI GTK also includes support for event handling which allows developers to respond to user input such as mouse clicks and key presses. Event handling is done through callbacks which are functions that are called when an event occurs. Another important feature of PI GTK is its support for internationalization. PI GTK provides tools for translating applications into different languages and for displaying text in the appropriate language. It is based on users local. PI GTK also provides support for theming which allows developers to change the look and feel of an application by changing the visual styles of the widgets. PI GTK applications can be run on multiple platforms including Linux, Windows, and Mac OS. The GTK toolkit and PI GTK library are born open-source software and are freely available for anyone to use and modify. Overall, PI GTK is a powerful JIO framework that allows developers to create rich graphical applications with Python. Its ease of use, flexibility and crossplatform support make it a popular choice for developers to develop desktop applications. Now we'll talk about the advantages of PTK. The first is native look and feel on Linux and Unix based systems. The second is easy to use with a large community and the third is large set of widgets and tools. Now we'll talk about the disadvantage of PI GTK library. The first disadvantage is limited crossplatform support. The second is limited set of widgets compared to some other frameworks. And the third is documentation is not as extensive as other frameworks. Now we have our next UI framework that is Pyforms. Pyforms is a Python based UI framework for creating desktop applications with minimum effort. It is a powerful and flexible tool that simplifies the process of creating graphical interfaces for data management and visualization. Pyforms offers a range of features that make it an excellent choice for developers looking to create desktop applications quickly and efficiently. Some of these features include the first is crossplatform support. Pyforms is compatible with multiple platforms including Windows, Linux and Mac OS. Pyforms offer a drag and drop UI builder that enables developers to create user interfaces quickly without writing code. And the third is customizable widgets. Pyforms includes a wide range of customizable widgets that developers can use to create advanced graphical interfaces. And the next is MVC architecture. Pyforms follows the model view controller architecture pattern which separates the user interface logic from the data management and application logic. The next feature is data visualization tools. Pyforms include powerful data visualization tools that make it easy to create charts, graphs and other visual representation of data. And the next feature is multi- language support. Pyforms support multiple language supports including English, French and Spanish which makes it a popular choice for international developers team. And the next feature is built-in testing tools. Pyforms include built-in testing tools that enable developers to test their applications easily. And the next feature we have is active community. Pyforms has an active community of developers who contribute to the framework and provide support through forums and other channels. Pyforms is a great choice for developers looking to create desktop applications with minimal effort. It's crossplatform support, drag and drop GUI builder, customizable widgets, MVC architecture, data visualization tools, multiple language support, built-in testing tools and active community make it a powerful and flexible tool for creating desktop applications. Now if we talk about its advantages, the first advantages easy to use with a modern look and feel. The second is large set of widgets and tools. The third is crossplatform. Now if we talk about its disadvantages the first disadvantage is smaller community than some other frameworks. The second is less documentation and resources than other framework. Overall each of these libraries has its own strengths and weaknesses. So it's important to choose the one that best fits your needs and skill set. Long story short, the best UF framework for you depends on your needs. For absolute beginners, Pi Simple GUI is a great starting point. While those looking for more advanced features might prefer WXPython or PIQ5. If you need a touchscreen UI, Kiwi is recommended. And for form-driven applications, Pyform is a good choice. If you are still using Python 2, you can try Pygi, Pyite 2 or WX Python. But you should be aware that Python 2 is no longer supported. This session will introduce you to the Tinter module, its widgets and their uses. After that, using these widgets, we will create a dollar to rupee converter. I will move to C drive. And in Python projects I will create a folder with the name tin tutorial and inside I will open the command prompt and write the command code space period and press enter to open my IDE that is I'm using the visual studio code. You can use any IDE you want or you have your hands on. So now we will make a file and name it as TT. PY. You would be amazed to know that there are various GUI frameworks for Python. But only tinter is included in the standard library. That is if you install the Python it would come along with that only you don't need to install it again or write any command to install it again and Tinter has a number of advantages the same code runs on Windows, Mac OS and Linux since it is crossplatform oriented and in contrast to other frameworks. Tinter is lightweight and generally simple to use. This makes it an appealing option for creating GUI apps in Python. So starting with first we'll import tinter module. For that we will write the command import t and we'll use an lis here and we'll import it as tk. So first we need to create a tick interm window and we will add a single widget in that and show you guys how we will create that window. So first you will get your python ideally open and just import the t interm module as we have imported here. And now to make the window we'll write a command window equal to tk what we have imported and we'll write tk and enclosed circle brackets. Here window is an instance of tk tk class. Now we will create a new window and assign it to the variable window. So this is the TK class. Now when we write window dot main loop, so it will repeat the loop and when we add widgets in it, it will keep on repeating and it will show you the window with all the widgets. So first we'll save this file and run it. You can see that we have the tick enter window here. So this is how you create a tick enter window. Now moving on. Now we will set the title for the tick enter window. I will show you again as it was showing TK. It's showing TK. So we will change the title for the taken to window and to change that we will write a command window dot title and in the circular brackets we will write the title we want for tinto window I will write simply learn tin tutorial. So yeah, I will save this and run this file for you guys. So you can see that it has shown the title. So we'll just stretch it and you can see the title here. So we can stretch the take inter window till we have not set the resizable method false. If we set it as false or zero, it would not be able to stretch the tick enter window as we are able to stretch it now. So this arrow it won't be available after we set it as false. Now moving on after setting the title now we will set the geometry. That means the dimension for the take window. For that we'll use the geometry method and it's a fundamental method which decides the size position and some other attributes of the screen layout we are going to create. So for that we'll write a command window dot geometry and inside you could write the dimensions. First we will set the width that is x-axis. We'll set it as 600 pixels. Then we'll write small x. Then the y-axis or the height of the window we'll set it as 500. And after that we will add plus. What this indicates is 290 pixels. That is the window will appear on the screen 290 pixels from the x-axis. And for y-axis we will add 10. So it would appear 10 pixels from the y-axis. So we'll save this and run it. You could see that 290 pixels from the x-axis and 10 pixel from the y-axis. And we've set the geometry that is 600 pixels that is the width or the x-axis and 500 that is the y-axis the height. So now moving on, now we have created the window. Now we'll add a widget and show you guys how we add a widget. Before that uh let us know what kind of widgets we have in tinto. So in this tutorial we will be learning around five widgets. So we will start with label and label it's a widget that is used to display text on the tin window or your screen. And next we would be having the button widget that can contain text and can perform an action when clicked. It could have any action or it could have just a text without any action. Then we will have the entry widget. It's used to get any entry from the user or a single line of text. It also get multi- lines of text. For that we have to set other attributes. And next we would be seeing the frame. So a frame it's a rectangular region used to group related widgets or provide padding between widgets. So these are the five widgets that we would be learning. So I counted you four but here you will learn other widgets that would be canvas and you would see the photo image object and other things. So moving on, we will use many widgets. First we'll create a single widget and show you guys how we'll create it. And we'll start with the label widget. So for that we will call the label class for that. And I will set you greeting for you guys. So greeting equal to label. So here we will use tk.l class to add some text to a window. We will create a label widget with the text hello learners welcome to tinder tutorial and assign it to a variable greeting as we have assigned started assigning it. And the window you created earlier doesn't change. You just create a label widget, but you haven't added it to the window yet. There's several ways to add widgets to a window. Right now, we can use the label widget and then we'll use the grid method or the pack method or the place method to show that widget on your window screen or on the tin window. So, starting with creating the widget. Now we'll set the text for it and text that would be equal to hello learners and welcome to TK tutorial. And by the way guys uh some people call it as skto. I call it as T inter and many call it as TK inter. So you guys can pronounce it at anyway. Okay. So welcome to T inter tutorial. Now here we will use the place method. So for that we'll use greeting dot place and here we'll use tk dot level and we will place it at here we will assign the coordinates as we have created a window with x axis and y-axis here we will assign our x coordinate as 190 and ycoordinate as 210 as we have the window and in that we have x-axis at full length of 600 and y-axis with 500. So we are placing it at 190 and at y-axis at 210. And similarly with the place widget we have like take inter has three built-in layout managers that use geometric methods to position widgets in an application frame. Uh first we have back widget that organizes widgets in horizontal and vertical boxes that are limited to left, right, top, bottom positions and many other positions. Each box is offset and relative to each other. And here we are using the place. So place places widgets in a two-dimensional grid using X and Y absolute coordinates. Then we have the grid. So grid method locates widgets in a two-dimensional grid using row and column absolute coordinates. One thing is important when you use this pack place or grid. You should not be combined these all in the same master window. Instead choose one and stick with it. Further you will know why we should stick with one only. So here we have created a label and placed it in a variable grading. So we'll save this and run the window. You can see that we the tick to window has appeared and we can see the text that is placed on a label and the text says hello learners welcome to the tin tutorial. Now moving on we will comment this and now we will add some functionalities to the label widget only. So for that we will create label and here we will not assign it to any variable like we will assign it to a variable and name it as label only tk dot label and this would be capital for label and Inside we'll add the text and that would be same that would be hello welcome to tint tutorial. After setting the text for our label here we can set the foreground and the background color. So for that we will write FG that is foreground and that would be equal to white color and we'll set the background for the label as green. For that we'll write the command bg equal to green. And now now to uh get this label showed on your tick to window you have to use any of the three methods that is pack place or grid. So now we will use the place method only. So first we'll write the variable name that is label and the place method and inside we'll set the coordinates that is x = 190 and y = 210. Now we'll save this and run the file for you guys. You can see that the label has got the background color as green and the foreground color for text as white. So now moving on we can add other attributes to the label widget and that would be the width and the height. So for that we'll write width that would be equal to 30 and height we'll set it as 10. So now we'll save this and run the file again. You can see that uh it has expanded itself. So we have set the width equal to 30 that is the x-axis it has expanded to 30 pixels and height equal to 10 pixels. So uh I have told you that label widgets are used to display text or images and the text displayed by label widget can't be edited by the user. It's for display purpose only. Label widgets display text with the default system text color and the default text background color. These are typically black and white respectively. But you may see different colors if you have changed these settings in your operating system. And you can control uh sorry control label text and background colors using the foreground and background parameters as we have seen that. So moving on uh as you have set the color uh with the words here you could also set them with the hexa code. So to set them with the hexa code, you could just write the hexa code for the color. And here I will use this purple color or what there would be a specific like the dark blue magenta but you call this color. So I will save this and run it for you guys. First I will close this. So here you can see that I have set the color with a hexa code and like the text it's coming out of the width. So for that we'll set the width as 50 or set it as 500. Set as 50. Close the previous window. Save the file and run it again. Here you can see that we have set the width as 50 and yaxis that is height as 10. So moving on we will start with button widgets. So we'll close this taken to window and command uh command down this. Now we'll start with button widget. So button widgets are used to display clickable buttons like there would be text and those buttons would be clickable. You can configure them to call a function whenever they are clicked and in many ways a button is just a label that you can click. So as we have set the height and width for the label, we can set it with the same parameters and the difference is you can just click and that turns out to be a button widget. So to make the pattern widget, we will start with variable And to set the button we'll use tk dot button and inside we will set the text that would be click me to say hi. So when you click it I will have to set a function to get its functionality. So click me to say hi. So this would be the text that would be displayed on the button and then we'll set the width for the button and we'll set it as 25 25 pixels and then the height and that would be 2 pixels. So width that would be equal to 25 and height that would be equal to uh we'll set it as 2 pixels only. And then we'll set the background color that would be white and we'll set the foreground color as black. Background color is white. And for foreground we'll use FG. And that would be equal to black. [clears throat] And now if you want to add some functionality you can add it in the command. So first we will declare the function and add the functionality for button and after that we can use the command. So we'll just pack it and see how a button looks in a tin window. So for that we will use okay we have written it here. Sorry for that. So we are set with the button. Yeah, we'll save this file and click on the run button. You can see that uh the button is displayed on the tick and to window. So it's clickable. So that's what make it differentiate from the label. It's clickable. Now we will add functionality so that we can have some text when we click on this. So for that first we'll create a and we'll create the function here and name it as hello. And here we will create a label in this function and inside we will place a text and that would be I learners welcome to enter tutorial. And now in this function only we will set like in the label. So the label will set the foreground color. Uh forground color we will set it as white. and background color we will set it as green. Okay. Now we will pack it so that it gets visible on a tick enter window. So we can also pack it here. we will just use the back method and it will get showed up in a taken to window. So now we have created a method or a function and we have that functionality. Now we have to set that uh this functionality to a button. So for that we will write command and that would be equal to the name of the function that is hello and it's capital H. Okay. And we have packed the button. So no need to do it again. So we'll save this and run it. So you can see that uh we are seeing a button here and that says click me to say hi. That is what we have set the text for it. When we click it, we see the functionality that is it has displayed a label with background color that is green and foreground color that is white and it displays the text as hi learners welcome to tint tutorial. So this is about the button widget. Now moving on now we'll start with the entry widget. So for that oh sorry first we'll comment this and we'll also comment this function. So now we'll start with the enter widget. So why we use enter widget? When we want to get text from a user like a name or an email address, we use an entry widget. It's a display that display a small text box that the user can type some text into. So creating and styling an entry widget works pretty much exactly like the label and the button widgets. So we will start with the enter widget and for that first we'll create a label only and on that label we'll place the enter widget. So first we'll create a [clears throat] variable and name it as label only and after that we will go with this like creating label and then we will add some text to the label that would be it will ask what is your name or we'll just add name to it and Here we'll create the enter widget. For that we will create a variable and name it as entry. And now we'll create the entry widget. So this is the simple method to create any entry widget. We have created that and now we have to place or pack or grid it to get a display on a tick enter window. So here we will use pack label dot pack and we will also pack the enter page. So we are done. Now we'll save it and run it. You can see that we have created a label and placed the text here that is name and beneath that we have packed an enter widget and inside we can enter anything that's my name abisar rahuja and you can enter anything. So these are the basic functionalities for the entry widget. You could see our other videos to get the hands on this entry widget and other widgets to get the other attributes and functionalities and use them in any app you want to make. So moving on, we will comment this or I'll give you an another example for the entry widget. So for that first we will create a label only and inside we will place the master that is the window and assign text to it and That would be name only. Here we'll create a form and it won't be having some functionalities to store the information but it would be a form for name, email, password and for that we'll use the inter widgets. So we have created a label here and here you will so we will use the place method to get it displayed on the taken to window and we'll set the x coordinate as 30 and y as 50 pixels. And moving on, we will set the entry widget and a label. First, we'll set the label for email. So that will also create a label and inside we'll pass the master that is window and set the text as email only. So it get displayed on the label. Now we'll use the place method only to get it displayed on our tin window. And for this I will use x = 30 and y = 90. it would in the same x coordinates and in y direction it would be shifted downwards and that would be y equ= to 90. Now I will create another label and store it in a variable that would be password. And to create it I will write tk dot label. Sorry. And here I have the small info label and inside we will pass the master window that is window and set the text as password only. And now we will place this label and we'll set the x coordinate as 30 and y will shift it downwards and set it as 130. Yeah. So these would be the labels. And now see these labels like how they placed. So you can see name, email, password. And now we will place entry widgets in front of them. So to get the entry widgets first we will assign a variable and inside that we will create an entry widget that would be ticket. entry and inside we will pass a master window and now we will place this at x = 80 like it would be sufficient I think so now we will see when we will get with this Okay. So we have set the x coordinate as 80 and y is 50. Now we will make another entry widget for email and then for password. So for this we will name the variable as e2 and here we will just a second. Okay to okay we'll do it tk dot entry and e would be capital for that and that would be the master window and we'll place this at x = 80 and y will shift it downwards that would be same for the label email that was 90 and now we'll create another variable that is E3 and for that we have created an entry widget and now we will place this and set the X coordinate as 80 only and ycoordinate that would be the same for the label that was 130. So we will save this and run it. You could see that name, email, password that are the labels and we have got our enter widgets and it's overwriting. So we will set this as 100. We'll save it and run it. You could see that it has shifted 20 pixels apart from this uh from its previous position. So this is about the enter widget. So this is a basic tutorial. So I won't be getting into the get method, delete method or the insert method. So there are three main operations that you can perform with entry widgets that is retrieving text with get method that is dot get method and deleting text that is with delete method and inserting text that is with insert method. So we will do this much only in this basic tutorial. And moving on now we will create some frames. So frame widgets are important for organizing the layout of your widgets in an application. Like you have many widgets and you have used around three to four widgets and you want to organize them. So you have to create widget that is frame and inside that frame widget you can organize all the other widgets. So an empty frame widget is practically invisible. You won't be able to see that if you haven't placed any widget in that. So frames are best thought of as containers for other widgets. You can assign a widget to a frame by setting the widgets master attribute as we have set the master attribute as window in the enter widget and in the label as we have seen in the enter widget example. So here we will start with creating frames and for that first we will assign a variable frame a and that would be equal to tk dot frame. We will create a frame. Sorry. And now we will create a label for that and we will assign the variable as label a and that would be equal to tk dot label and inside we would get this label fixed into the frame. So for that we will set the master as frame. So we have set the variable as master here and this variable contains the frame. Now we will add the text to the label and that would be this is frame A. We will name it as a and here we can set the background color also. So here we will use the hexa code for that. We won't write the simple name of the color. So here we will write the hexa code and have taken its inverted comma. So now we have to set the background color and that would be in the inverted commas only. So we will start with hash and we'll set the class. I remember the hex code for 468 to be four two color. So you will get the background color. And now we will back this label so that it uh gets displayed on your tent window. Okay. So for that we will write the variable and use the back method. And now we'll create another frame and store it in a variable frame_b. And inside we will create a frame tk dot frame and here we will create another label that would be label_b and that would be equal to tk dot label and here we'll set the master as frame only as we will be setting this label into the frame so for that we'll write frame B. Now we'll set the text that would be this is frame B. Okay. Now we'll set the background color and we will set the background color different from the above. So you can differentiate that. So in 999 67 A and for the hexa code you have to use hash. So what you call this color like light red, light orange or anything. So just get that sorted. So we'll pack this widget. For that we'll use the variable label_b. We'll use the pack method and we have packed it. Now we'll save this show the red. Okay, we have not placed inverted comma here. So we'll save this and run it. Okay. Label is not defined. So we have written label. Okay. So sorry for my same mistake. So we'll save this and run it again for you guys. So here we are not able to say it. So what? Oh, we have not packed the frame here. So we would not be able to see that. So we'll back it here only. So first we'll back frame a dot back and then frame dot pack. Now we'll save this and run it again. You could see there's two frames displaying that is this is the frame A and this is the frame B and this is the label on above the frame and if we just swap these packs what would happen let's see we'll save this and run the file again you could see that the frame has been shifted so the pack method it just pack the widget objects line by line by line in a layer form. So you must be careful with that. Okay. So now we'll see some appearance for the frames. We have seen how to create a frame. Now we'll see how these frames can be displayed. how how its appearances are like we have the five appearances. We will discuss it and we will adjust these frames according to their appearances and these appearances can be called out with the method or with the attribute that is relief. So frame widgets can be configured with a relief attribute that creates a border around the frame. You can set relief to be any of the values uh that is the flat value that we have seen that has no border effect the default value. Then there is sunken that is su n k in the capitals that it creates a sunken effect. I will show you like what that effect is. Then we have the raised then groove and the ridge. So for that we will see a simple example. And one important thing to apply this border effect we must set the border width attribute to a value greater than word greater than one. This attribute adjust the width of the border in pixels. So for that uh we will create the frames and we will start with border and that would be equal to we will create a dictionary here. So for the flat keyword we will create a in the capital letters we have to write flat. Okay. And for the sen we will create tk dot set. Okay. And in dictionary we have to place the commas. And after sunken we have raised groove and ridge. So for that we'll write and we'll get TK. I have done a mistake above. So this would be TK dot. So we can comma and now we will have the group order. It is TK dot group comma and after that reg is TK dot reg. Okay. So now we will run a loop for relief name, relief in we have set the border and And that is we will iterate these items one by one. And now we will create a frame that would be DK dot frame and set the master as window and relief equal to relief and set the border width. That's also the point. And we'll set it as five. Okay. And now we will back this frame. So for that we'll use the back method. Frame dot pack. And now we will create a label that is tk dot label and inside we'll set the master as frame and text we'll set the text as relief underscore for name and then we'll pack this label. Okay. Now we'll save this and display it for you guys. So you could see that first we have the flat frame then sunken then raised then grew then ridge. Okay. So if you want to set these frames on the left side for that you can use tk dot left attribute. I will save this and run it for you guys. Oh u we have to assign it inside. Sorry, I will save this and run it for you guys. So you can see that uh it has shifted to left like all these are packed in the left direction all the frames. So now moving on. Now we will see the frames with different colors. I'll just comment this down. And now we will get the frames. We'll start with a variable and name it as frame one and create a frame TK dot frame with capital F and inside we'll set the master as window and width as 100 and height as 100. and background color we'll set it as red. And now we will pack this frame. So this frame would be of the red color. So to pack this we will write frame one that is the variable in which the frame has been stored and we'll use the pack method. So we have packed it. Now we will use fill to fill this frame in the whole window. For that we will write fill equal to tk dot capital sx. So it will get this frame fulfilled in the window in the x direction. And similarly we will create another frame. I will copy paste it and name the variable as variable as frame two. And inside I will change the color and I will set the width and height now. Okay. I will show you like how it will work. Pack this frame two do. And now we'll also set another frame and name it as frame three. Okay. And for this also we have to set another color so that we can differentiate that which frame is this. So I'll set it as blue. Now we will save this and run it. So you can see that uh we have set the width and height but we have use the fill attribute to fill it in the whole x direct x direction. So it has got filled up. So these are the three frames we have created. Now we have seen the basics or the beginner for the T inter module. Now using these modules we will create a simple project that would be dollar to rupee converted as I have told you earlier in the starting in the introduction. For that we will just create a new file and named as dollar to rupee converter py. So if like rupee so here we will use the current value of what $1 is equal to rupee. We will set it as current value. So we will search it in the web and use it in a function. Okay. So we'll make this project a simple one or just a simple app to get you hands on with these widgets. Okay. So starting with importing. So first we'll import tin and as we have seen earlier we have used allias for that and here also we'll use that and after that we will create window that is equal to tk dot tk class and window dot main loop. Okay. Now we will set the geometry of the window. So for that we will write and we will set the x-axis with 300 pixels and small x and yaxis as 250 pixels. Okay. And we won't be adding some pixels to the x or the y direction. it will just come in the default section that uh this idea would get it appeared to. Okay. Now we'll use the configure function and set the background color. So with configure you could set the background color and other attributes. So for that we will write window dot config and inside we will set the background color bg equal to and I remember the hexa code for that here we will use hexa code or you could just write the name of the color okay E9 67A we have used it previously the light red color okay Now uh I have discussed with you that the resizable function but we haven't used it in the former that is the py file but here we will use so for that we will write window dot resizable and inside we will set the width equal to false and height also as controls. So you won't be able to adjust its width or height width or height and you won't be seeing any arrow for that. Okay? Like if you place the cursor on the border of the window now, you won't be able to see any error to get it stretched out in the X or Y direction. So we have use the resizable function for that. Now we'll set the title for this window. For that we'll write window.title and inside we'll write the title that would be dollar to rupee converter converter. Okay. Now, first we will start with a label and we will add the heading as dollar to rupee converter only. So for that we will create a label and place it inside the variable L1. TK dot lab table and inside we will pass the master as window and set the text as dollar to rupee converter and we can set the font also. Okay, for that we'll just use the font attribute and inside we have to place these in a circular braces. So for that we'll write we have and it's inverted comma uh we'll use AIAL here. Okay. and set the font size as 15. Now we'll close the circular bracket. Okay, we have to close one more and we'll set the foreground color as white. Okay. And we'll also set background color. And that we would set as hex code B C 0. Okay. C 0. Okay. And that would be in the inverted commas. Else it would be termed as the comment only. And now we'll close the circular bracket. Okay. And we will pack it at the last only. Now we will create another label. And for that we'll store it in L2 variable. For that we'll write TK dot label. And inside we will pass window as master and text. And here we will set the label as enter dollar amount. Okay. So that will write text enter dollar amount. Okay. Now we will add some functionality and after mode we'll write the colon. Now we'll set its font in the circular braces. And we'll set this also as a and set its size just smaller than the heading that would be dollar to rupee converter. We'll set it as 10. Okay. And we'll set it as bold. This we have to place it in inverted commas. And after the font we'll set the foreground color that would be equal to white. And then we'll set the background color. We have taken the inverted comma white. Now we'll set the background color and for that we'll write the hexagode and that would be a 5 69 BD. So we'll see this purple color. So I call it purple. I'm bad with color. So you can see what you want to call this color or like what's the fundamental name of this color. So now we have created two labels and dollar amount and now we create we will get another label and that would be amount in rupees like after we will execute the dollar to rupee. So that would be displayed in that label that would display just beneath this label that we will be creating that would be L3 and for that we will write TK dot label and inside we will pass the master as window and set the text as amount in rupees. is okay. And now we'll set its font. And we'll set it same only as area. And with the font size 10 and we also set it as bold. Okay. So outside this font we will set the foreground and background color. And that would be foreground color white and background color. We'll write the exa code for that only. And that would be same A5 69 VD. Okay. Now we will create entry widgets. So first entry widget that would be for entering the amount enter dollar amount. So this enter widget would be beneath the enter dollar amount label. So for that we will create a variable E1 and create an entry widget TK dot entry and we have E capital for the entry and inside we will pass as window and we'll set the font as AIAL the circular braces. Okay. And set the font size as 10 and no bold for it. Okay. And in the window first we have created the
Original Description
🔥Professional Certificate in AI and Machine Learning - https://www.simplilearn.com/professional-aiml-program?utm_campaign=o1fjWjReodE&utm_medium=DescriptionFirstFold&utm_source=Youtube
️🔥IITK - Professional Certificate Course in Generative AI and Machine Learning - https://www.simplilearn.com/iitk-professional-certificate-course-ai-machine-learning?utm_campaign=o1fjWjReodE&utm_medium=DescriptionFirstFold&utm_source=Youtube
️🔥Microsoft AI Engineer Program - https://www.simplilearn.com/ai-engineer-course?utm_campaign=o1fjWjReodE&utm_medium=DescriptionFirstFold&utm_source=Youtube
️️🔥 Michigan - Applied Generative AI Specialization - https://www.simplilearn.com/applied-ai-course?utm_campaign=o1fjWjReodE&utm_medium=DescriptionFirstFold&utm_source=Youtube
This video on Python Full Course 2026 by Simplilearn will help you learn Python programming from beginner to advanced level and build a strong foundation in software development. The course begins with an introduction to Python and covers essential concepts such as variables, data types, operators, conditional statements, loops, functions, and object-oriented programming. You will learn how to work with lists, tuples, dictionaries, files, and exception handling. The tutorial also covers important topics like modules, libraries, and basic data structures used in real-world applications. You will understand how Python is used in web development, data science, automation, artificial intelligence, and machine learning. By the end of this Python tutorial for beginners, you will clearly understand Python programming concepts, coding best practices, and the skills needed to build practical applications.
Following are the topics covered in the Python Full Course 2026:
00:00:00 - Introduction to Python Full Course 2026
00:03:27 - How to install Python 3.13.5 on Windows 11
00:06:20 - Python Tutorial For Beginners 2026
00:57:56 - Operators in python
01:23:06 - Conditional Statements In Python
01:51:19 - OOPS in python
02:18:
More on: ML Maths Basics
View skill →
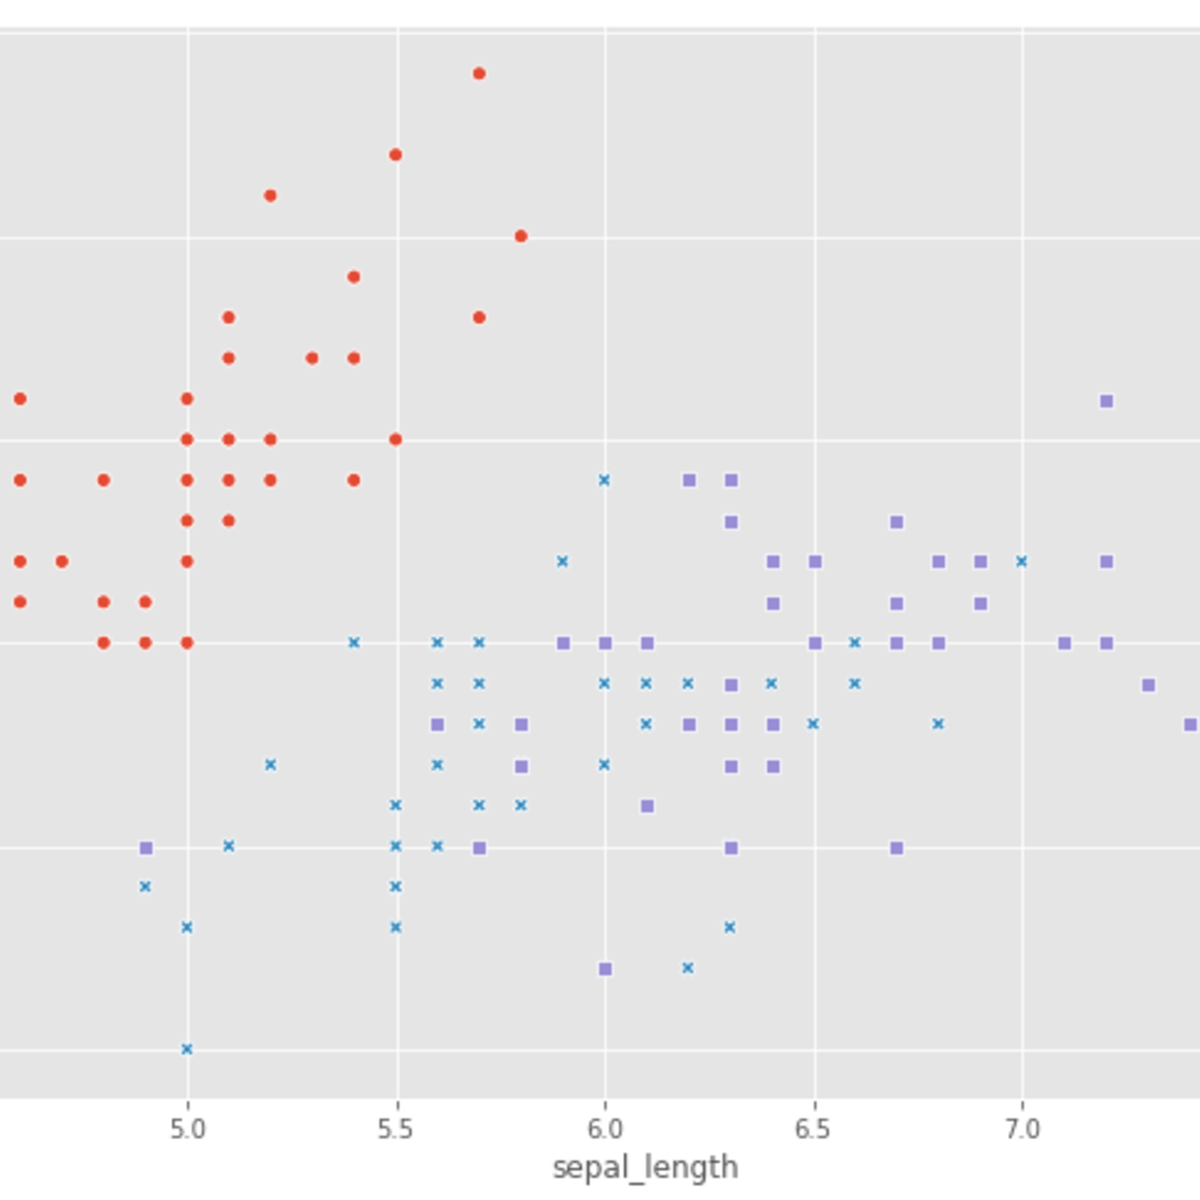

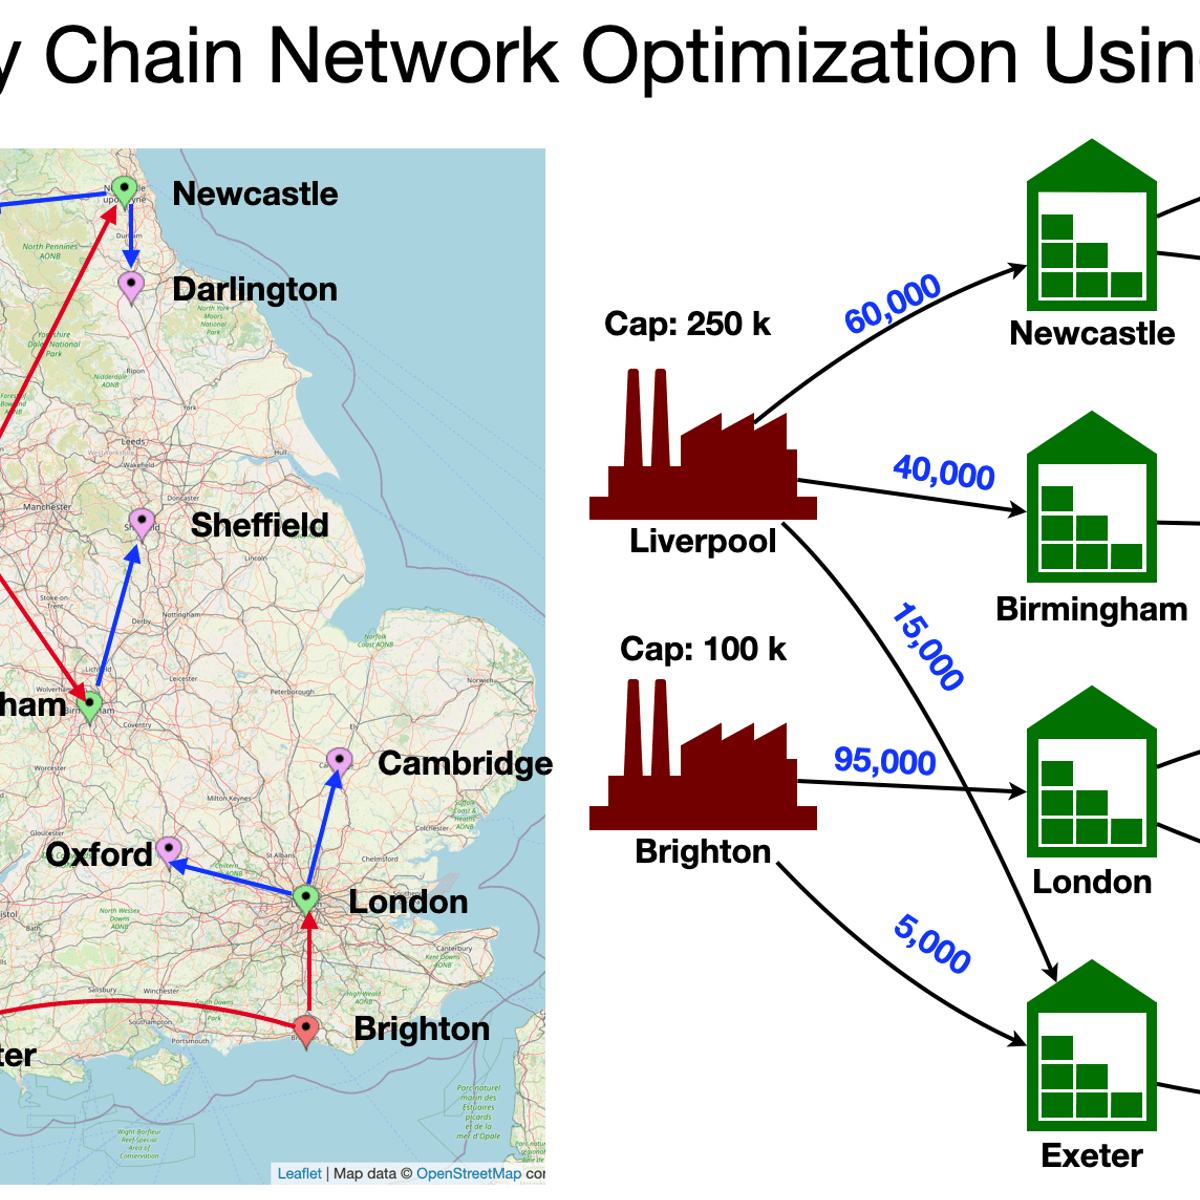

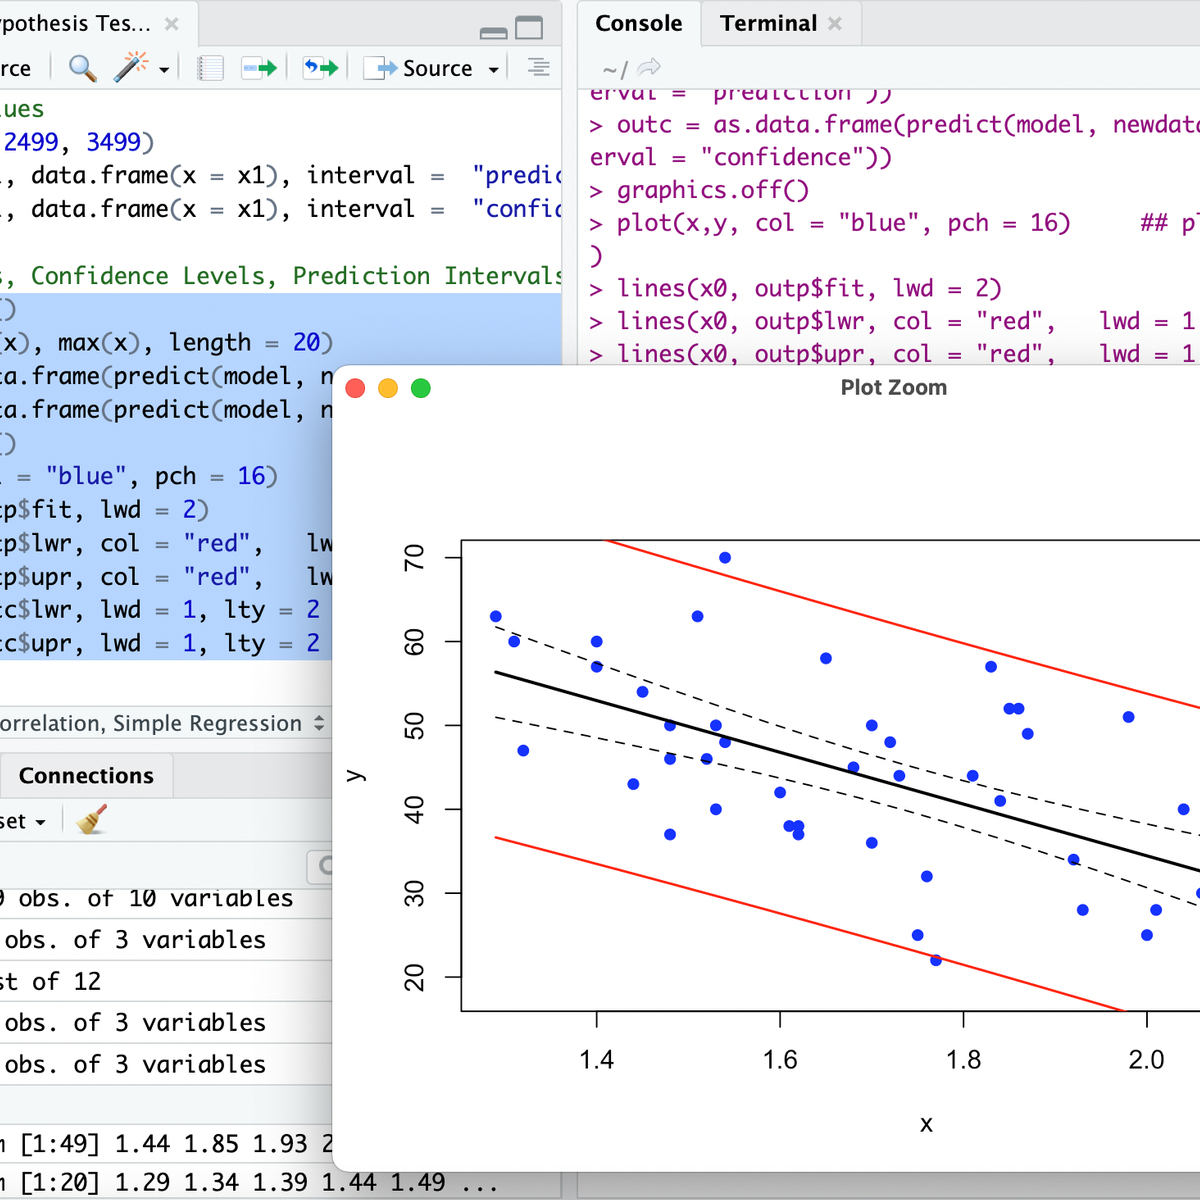
![AI With Python Full Course 2026 [FREE] | Learn Artificial Intelligence With Python | Simplilearn](https://img.youtube.com/vi/IvFW-r_S6UI/mqdefault.jpg)
Related Reads
📰
📰
📰
📰
When Locking Everything Isn’t Enough: ReentrantLock, CAS, and the Atomic Package
Medium · Programming
Day 14 of My Python Learning Journey
Medium · Python
7 Python Iterator Tricks I Wish I Knew Before Processing Millions of Rows
Medium · Data Science
7 Python Iterator Tricks I Wish I Knew Before Processing Millions of Rows
Medium · Programming
Chapters (6)
Introduction to Python Full Course 2026
3:27
How to install Python 3.13.5 on Windows 11
6:20
Python Tutorial For Beginners 2026
57:56
Operators in python
1:23:06
Conditional Statements In Python
1:51:19
OOPS in python
🎓
Tutor Explanation
 DeepCamp AI